Define District Remote Services preferences
Use the
- Configure Aspen's integration with Destiny.
- Set preferences for WebPath Express, One Search, and Digital Resources (DCPI). These appear on the Destiny tab in the Staff view and the Student portal
|
Note: The Aspen system administrator should complete the Remote Service preferences to configure Aspen's integration with Destiny. To complete the setup, you also need to set the School Remote Services preferences. After setup, changes to student data and class schedule data in Aspen can flow directly into Destiny. |
To define the Remote Services preferences:
- Log on to the
- Select
- Click the Category drop-down to select Remote Services. The Remote Services page appears.
-
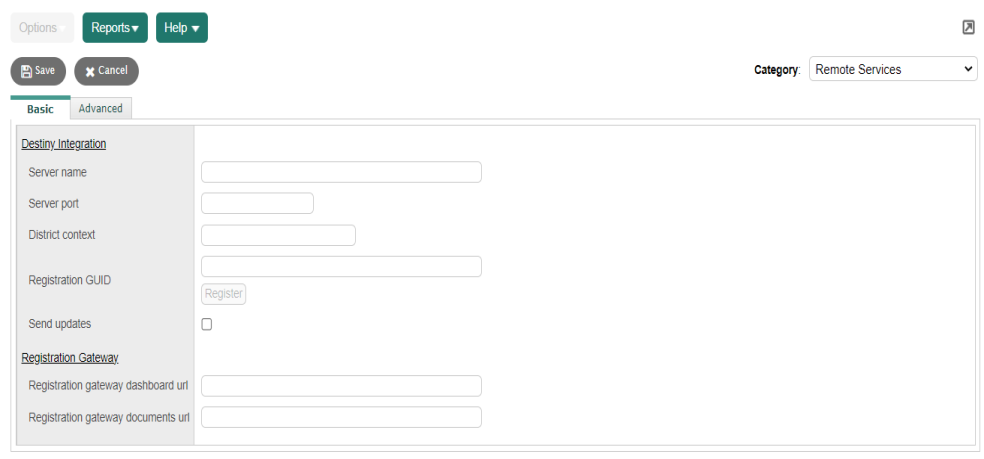
- Use this table to enter information in the fields on the Basic sub-tab:
-
Field
Description
Destiny Integration
To complete the setup for Aspen-Destiny integration, you also need to set the School Remote Services preferences. See Define School Remote Services Preferences.
Server name
Type the IP address of the Destiny server (given to you by the Destiny administrator). Omit the http:// or https://.
Server port
Type the port on the Destiny server. By default, it should be 443.
Type the
Registration GUID
Type the GUID provided by your Destiny administrator. The GUID appears in the Aspen SIS Configuration section of the Destiny admin page. Click Register to make a connection to Destiny. When a Success message appears, click OK.
Note: After receiving a Success message, do not click Register again.
Send updates
Select this checkbox to send periodic updates to Destiny from Aspen.
Note: For periodic updates to work, the Audit enabled checkbox must be enabled in the General
You must also create a job to run the Destiny Synchronization Export periodically. See Create and Schedule Jobs.Registration Gateway
Registration gateway dashboard url
Your
Then, users with the appropriate privileges can click the Registration Gateway icon
 to review student registration information.
 The Registration Gateway icon appears in the:
- Toolbar in the
- Toolbar in the Family portal, Family > Documents
- Homepage in the Family portal
Registration gateway documents url
Your
Then, users with the appropriate privileges can click the Registration Gateway icon
to review student registration information. The Registration Gateway icon appears in the:
- Toolbar in the
- Toolbar in the Family portal, Family > Documents
- Homepage in the Family portal
- Toolbar in the
- Click the Advanced sub-tab, and follow the steps in the table below:
-
Field
Description
The Destiny tab in the Staff view and Student portal contains a search engine incorporating the following databases.
WebPath Express
Service host
Type the URL of the WebPath Express server.
Service port
Type the port number you want to use to access the WebPath Express server.
One Search
Service host
Type the URL of the One Search server.
Service port
Type the port number you want to use to access the One Search server.
Digital Resources (DCPI)
Service host
Type the URL of the DCPI server.
Service port
Type the port number you want to use to access the DCPI server.
Provider configuration
Click Launch to configure educational resources that your
Click Launch Provider Configuration Site. A list of digital resource providers appears. Select the provider whose content you want to configure, and follow the steps below.If you select:
- CCC! Core Curriculum Content:
- Select the checkbox next to the content you want to add.
- Click Add Selected.
- At Host, enter the URL provided by the vendor when the content was purchased.
- Click Save.
- Curriki Inc.:
- Select the checkbox next to the content you want to add.
- Click Add Selected.
- Click Save.
- PebbleGo:
- Select the checkbox next to the content you want to add.
- Click Add Selected.
- At Sqs ID, enter the unique ID provided by the vendor when the content was purchased.
- Click Save.
Destiny Search
Service URL
Type the URL for the Destiny Search website.
Type the Destiny Search site ID. This ID is found on the Destiny Admin page.
Site
Enter the site listed on the Destiny Admin page. State Standards
Service URL
Easily find standards-aligned
Disable HTML filtering for content standards
Select this checkbox to preserve any characters that could represent HTML in the state standard import's text. When selected, this option displays the original imported text from the state standard, without filtering out the HTML markup. Note: To complete these fields, it is recommended that you open two browser windows: one for Aspen and one for the Google Developers Console. In the Google Developers Console, open your Aspen project, and then select API Manager > Credentials.
Client ID
On the Google Developers Console's Credentials page, copy the information in the CLIENT ID field, and paste it into this field in Aspen.
Client Secret
On the Google Developers Console's Credentials page, copy the information in the CLIENT SECRET field, and paste it into this field in Aspen. To keep data secure, the characters are replaced with *****.
Browser Key On the Google Developers Console's Credentials page, under "API keys", find the browser key you created for Aspen. Copy the information in the Key field, and paste it into this field in Aspen.
- Click Save.
To define each school's Remote Services preferences:
- Log on to the
- Select
- Click the Category drop-down to select Remote Services. The Remote Services preferences page appears.
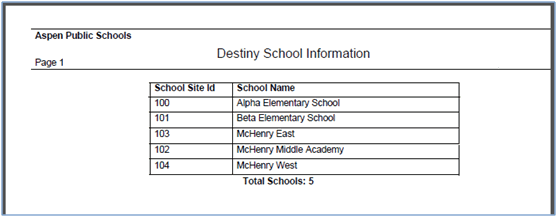
- Select Reports > Destiny School Report.The Destiny School Report pop-up appears.
- At Format, select the format you want.
- Click Run. A report in the selected format appears. Note the School Site ID number for each school.
-
- Go back to the School Remote preferences (
- At the top of the Remote Services page, notice which school is selected. If you need to select a different school, use the record navigation bar
 .
. - At Site number, type the School Site Id for the selected school.
- Click Save.
- Use the record navigation bar to navigate to each school to be configured with the Aspen – Destiny integration, type the School Site Id, and click Save.