Create and schedule jobs
You can create and manage jobs to standardize and automate tasks. Jobs can be used for reports, exports, imports, analytics, and procedures. First, pre-define the parameters, and then automate tasks by defining a schedule for the system to follow.
You might create and schedule a job to do the following:
- Permanently save the results of a report or export for later review.
- Pre-define the students to include and sort order for an export.
- Create and schedule a job for the Daily Attendance Bulletin report so it runs automatically every day.
- Configure delivery options, such as emailing the Daily Attendance Bulletin report to a teacher, or copying it to a folder on the server’s file system.
- Create a graph comparing year-over-year student performance by school.
You can enter and schedule jobs when logged on to the
|
View |
Job Scheduling Privileges |
|
|---|---|---|
|
|
|
|
|
|
|
To create a new job and schedule a time for it to run:
- Log on to the
- Select Tools > Jobs.
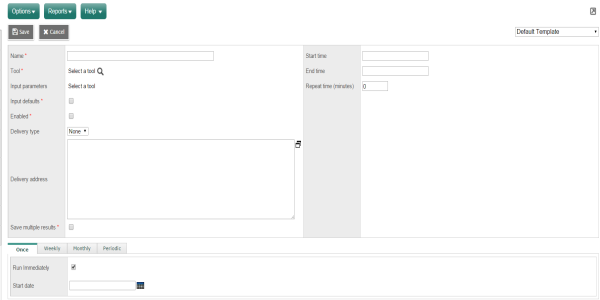
- Select Options > Add. The New Job
Entry page appears.
Note: You can also create a job for a report, procedure, export, import, and analytic under Jobs in each tool type's side-tab. Note that this function is restricted by the side-tabs available in each view.
- Use this table to enter information in the fields:
-
Field
Description
Name
Type a name for the job.
Tool
Click
 to select the type of tool you want to schedule a job for (report, procedure, import/export, or analytic definition).
The Tool Selection pop-up appears.
to select the type of tool you want to schedule a job for (report, procedure, import/export, or analytic definition).
The Tool Selection pop-up appears.Note: You can only schedule jobs for procedures and analytic definitions when logged on to the
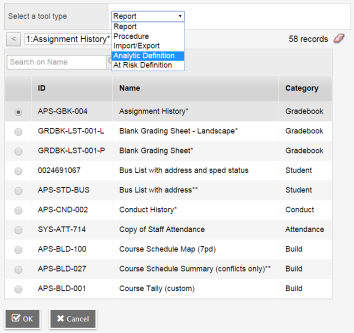
Click the drop-down to select a tool type. The pop-up then displays a list of all tools of that type that have been marked as schedulable at your current organizational level or higher.
For example, if you select Procedure when logged on to theSelect the actual tool you want to define a job for. Click OK. The Input Parameters field appears on the New Job Entry page.
Input Parameters
Click Set. The pop-up that appears is specific to the tool you selected. For example, if you selected Attendance Bulletin, the report parameters specific to the Attendance Bulletin appear. Select the tool input parameters, and click Save.
Note: This field is required. You must click Set and then Save, even if no parameters are needed. Input Defaults
Select this checkbox to use the system’s default input parameters. For example, if a report defaults to today’s date and is run daily, you might select this checkbox.
Enabled
Select this checkbox to enable the schedule you define for this job. The job will run automatically for the schedule you set. If Enabled is not selected, the job will not run automatically, but it still can be run manually.
Note: If you define a schedule for this job and do not select the Enabled checkbox, the system does NOT run the job at the scheduled times and days. Delivery Type
Select one of the following to determine if you want the job results sent, and if so, how they will be delivered:
- None: The results are available only by clicking Results on the Jobs side-tab.
- Email: The results are emailed
to the address(es) you enter in the Delivery
address field.
Note: If the job results do not get emailed to you, check the
- File: The results are saved to a file on the server, as determined by the path you type in the Delivery address field.
Delivery Address
Do one of the following to indicate where the results will be sent:
- If you selected Email at the Delivery Type field: Type the email address(es). Separate multiple email addresses with a comma.
- If you selected File at the Delivery Type field: Type the path and file name.
Save Multiple Results
Select this checkbox to save the results of every run of the job. Otherwise, the system only saves the results from the last run of the job.
Note: If you select the Save Multiple Results checkbox, be sure to manage the results on the Results page for each job. Entries on the Results page can accumulate over time, consuming disk resources on the server. Start Time
Type the first or only time you want the job to begin on any day you define the job to run. Certain jobs, like Analytic Definitions, are resource-intensive and should be scheduled for off-peak hours. It is also a good practice, because they access a large amount of data, to stagger the start times of Analytic Definition jobs.
End Time
If the next Repeat Time field is defined, type the latest time you want the job to run on any day you define the job to run. You need to define an End Time only if you define a value in the Repeat Time field.
Repeat Time (minutes)
Type the number of minutes between runs, if you want the job to repeat.
- At the bottom of the page, click the sub-tab that corresponds to the schedule you want to create:
-
Click this sub-tab
To
Once
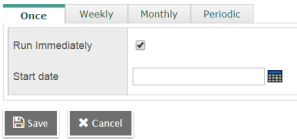
Select the Run Immediately checkbox to run the tool now.
The job runs only once and will not run by schedule again. To allow another scheduled run, define a specific run date and time, and deselect the Run Immediately checkbox.
Note: If you log off Aspen, the tool continues to run. Or, at the Start Date field, click
 to select
the date you want the tool to run. The system references the time
you entered at the Start Time
field.
to select
the date you want the tool to run. The system references the time
you entered at the Start Time
field.Weekly
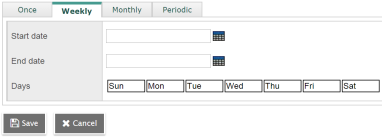
Click
to enter the start and end dates of the schedule.Click the days of the week you want the tool to run during the date range you specify. To deselect a day, click it again.
Monthly
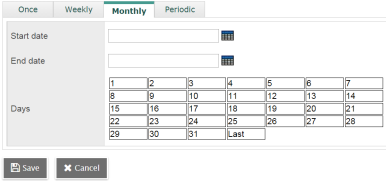
Click
to enter the start and end dates of the schedule.Click the days of the month so they are highlighted for the days you want the tool to run. To deselect a day, click it again.
Click Last to run the job on the last day of each month.
Note: If you select 31 instead of Last, months with 30 days will not run a scheduled job during that month since there is no 31st day of that month. Periodic
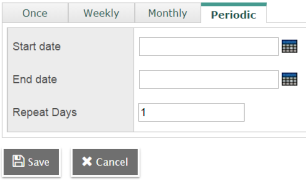
Click
to enter the start and end dates of the schedule.In the Repeat Days field, type the number of days between each day you want the tool to run.
Note: When you define a periodic schedule, be aware that the value you enter in the Repeat Days field includes weekend days.
- Click Save.
To view scheduled jobs:
- Log on to the