District (Root Organization) preferences
In the
To define general
- Log on to the
- Select
-
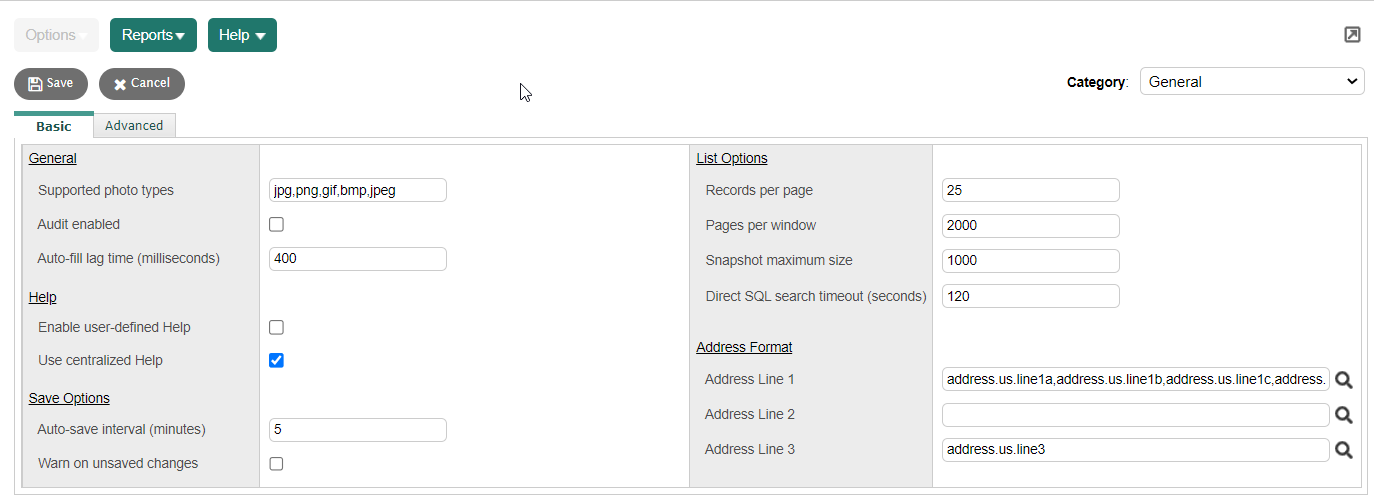
- Use the table to enter information on the Basic sub-tab:
-
Field
Description
Default Value
General
Type the photo file types you allow users to import into Aspen, separated by commas.
You can import only images of the types you enter here.
Note: Enter the types in the order you import most frequently. For example, if you import jpg photo files most frequently, type jpg first. For example, you might type jpg, gif, bmp, mpg.
jpg Audit enabled
Select this checkbox to enable the audit feature.
If you select this checkbox, the system tracks changes made to information in the tables and fields you specify. See Enable Tables and Fields to be Audited. When the audit
 view and investigate changes to information in specific fields or by a specific user
is enabled here and system administrators give specified user
roles the Change History
privilege, users can view
the history of changes on a detail screen.
view and investigate changes to information in specific fields or by a specific user
is enabled here and system administrators give specified user
roles the Change History
privilege, users can view
the history of changes on a detail screen.If you do not select this checkbox, the system does not generate audit records.
Auto-fill lag time (milliseconds) Type the maximum number of milliseconds to wait after the user stops typing to search for data. The longer the lag time, the fewer server requests will be made. The shorter the lag time, the quicker the auto-fill selection pick list will appear. 400 Help
Enable User-defined Help Select this checkbox to enable user-defined Help. This lets your
Selected Use Centralized Help Select this checkbox to use Aspen's centralized Help, which includes online Help, user guides and release notes – all available from the Help menu. This gives you access to the most up-to-date Help between major releases to Aspen.
If this checkbox is not selected, you must install Help on your
For self-hosted
Note: The most up-to-date Help is always available on the centralized Help server. Selected Save Options
Auto-save interval (minutes) Type the number of minutes you want to lapse before the system automatically saves the information a user enters on a details page. For example, if users spend a lot of time entering IEPs in the Special Education view, you might determine that the system auto-saves pages every 2 minutes.
The system displays a message to the right of Save and Cancel on detail pages, alerting the user of the time of the last auto-save, or why the auto-save failed.
Notes:
- Users can set this value for themselves on the General tab when they set their user preferences.
- If a user moves between sub-tabs of a details page, the countdown continues.
5 Warn on unsaved changes Select this checkbox if you want the system to display a warning when a user leaves a details page with unsaved information. Deselected List Options
Records per page Type the number of records, or rows, you want to view on any page in the system that appears as a list. The number you enter here, along with the font size for your Web browser and your computer's desktop resolution, determine if you will need to scroll on list pages or if you can view all records on a page at once.
Note: Users can set this preference for themselves. 25 Pages per window Type the number of pages you want to view in the Page drop-down  on a list page.
This preference helps improve performance for large lists like
student transcripts. For example, if you type 500,
and your student transcript list contains more than 500 pages
of records, the Page list displays pages 1 through 500. When you
click Next
on a list page.
This preference helps improve performance for large lists like
student transcripts. For example, if you type 500,
and your student transcript list contains more than 500 pages
of records, the Page list displays pages 1 through 500. When you
click Next ,
the Page list displays pages 501 through 1000.
,
the Page list displays pages 501 through 1000.
2000 Snapshot maximum size
Type the maximum number of records you want users to be able to include in a snapshot.
The number you type in this field prevents users from creating a snapshot
a static picture of a particular group of records that you can file and easily retrieve
that includes all records in a list.1000 Direct SQL search timeout (seconds) Type the maximum number of seconds you want the system to search for the results to your Direct SQL query a request to find a group of records that match specific criteria at a particular time.
This saves the system from becoming run-down by a query with complicated
or incorrect syntax.120 Address Format
Address Line 1
Address Line 2
Address Line 3
Click
 to select one or more validation expressions to determine how
the parts of an entered address are parsed into the appropriate
fields to display the address appropriate for the selected organization an entity that contains one or more schools
or locale (U.S., Europe, Japan, military, etc.).
to select one or more validation expressions to determine how
the parts of an entered address are parsed into the appropriate
fields to display the address appropriate for the selected organization an entity that contains one or more schools
or locale (U.S., Europe, Japan, military, etc.).For example,
ranges of addresses within a city, town, or county.
It also ensures data is entered in a consistent manner.Define the validation expression for address fields here, instead of using a custom data validation express in the Data Dictionary.
Expressions for U.S. addresses
- Click the Advanced sub-tab.
- Use the table to enter information into the fields.
-
Field
Description
Default Value
Supported Locales Locale 1
Locale 2
Locale 3
Locale 4
Locale 5
Define supported locales in the fields. You can define locales 1–5. For example, you might select Spanish in the Locale 1 field. Then, when you define reference codes for the Report Card Comment reference table, you might define Muy Bien in the Localized Description 1 field for the Excellent code.
Note: You can upgrade your report card to print a localized comment based on the student's home language. Contact your Aspen system administrator for help configuring this report.
Limit to organization This field is for school
When this preference is enabled, and a user looks up an address at an address field, Aspen limits the display to only those addresses in the database of the user's intermediate organization or school.
For example, a user at an intermediate organization wants to add an address for a student's contact, and clicks
 at the Address line 1 field (Student > Contacts > Details). If this checkbox is selected, the address pick list only displays addresses in the intermediate organization's database, not the root organization's entire database. If you do not select this checkbox, Aspen displays addresses from the root organization's database.
Enabling this preference affects:
- Student > Details (Parent/Guardian Information)
- Student > Contacts > Details
- Staff > Details
Deselected Contact searching If this preference is enabled, when a user enters a student contact and searches for a match, Aspen will only display contacts that are within the user's organization.
If this preference is not enabled, Aspen will display all contacts across all organizations.
Select this checkbox for Aspen to display an enhanced contact search pop-up when a user enters a student contact. On the pop-up, the user can type a first name, phone number and other parameters to limit the search results.
School Building Assignments
Enable school building assignments
Select to show the Building Assignments side-tab in the End Of Year Rollover Fields to copy to School from School Attribute Use this preference to change values stored in the School table, such as school name, school year, etc., from one school year to the next school year. You can pre-enter the changes here so you do not forget to enter them, and they will take effect when you complete the End-of-Year Rollover.
The School Attributes table stores these values, such as school information and school year. During the rollover, the values entered here are copied from the School Attributes table to the School table for the next school year.
You can also define custom fields on the School Attribute table from here. Define how the fields will be mapped by entering a comma-delimited name for custom fields, with each pair being a field ID on the School table and a field ID on the School Attribute table.
Example: sklSchoolID=skaSchoolID,sklSchoolName=skaSchoolName,sklSchoolType=skaSchoolType
Specify exact fields by sklFieldA00x, skaFieldB00y name for custom fields.
Historical Information Fields to copy from Student to Student Attributes Type the names of the fields in the Student table you want to copy to the Student Attribute table as historical data after the end-of-year rollover. Separate the fields with commas.
The fields listed are preserved by Aspen as historical data.
Example: stdViewName, relStdPsnOid.psnEmail01, DOE 16 Fields to copy from Staff to Staff Attributes Type the names of the fields in the Staff table you want to copy to the Staff Attribute table as historical data after the end-of-year rollover.
The fields listed are preserved by Aspen as historical data.
Example: relStfPsnOid.psnNameFirst, relStfPsnOid.psnNameLast, stfAdrsView, SR09 Archive lock date This preference lets you lock system table data based on the date entered here. It works with the Path to date field on a system table's details page.
Example: A Aspen will compare the lock date to the date field on a student record. If the student record's date is before (or the same as) the date entered here, the record is locked and can only be edited by the system administrator or another user with the Override archive lock date privilege.
Calendar Initialization
Required session days Type the number of days schools in your
Note: This value can be changed for individual school calendars. 180 Enable intermediate organizations to initialize When selected, this field allows your
Root organization
Deselect this checkbox if you wantTools
Enable intermediate organization reports
If you select this checkbox, the Tools tab, Reports side-tab will appear in the
Other side-tabs on the Tools tab will also appear, enabling
- Click Save.