Define District (Root Organization) Membership preferences
In the
To define
- Log on to the
- Select
- Under the Setup side-tab, click Preferences. The general preferences page appears.
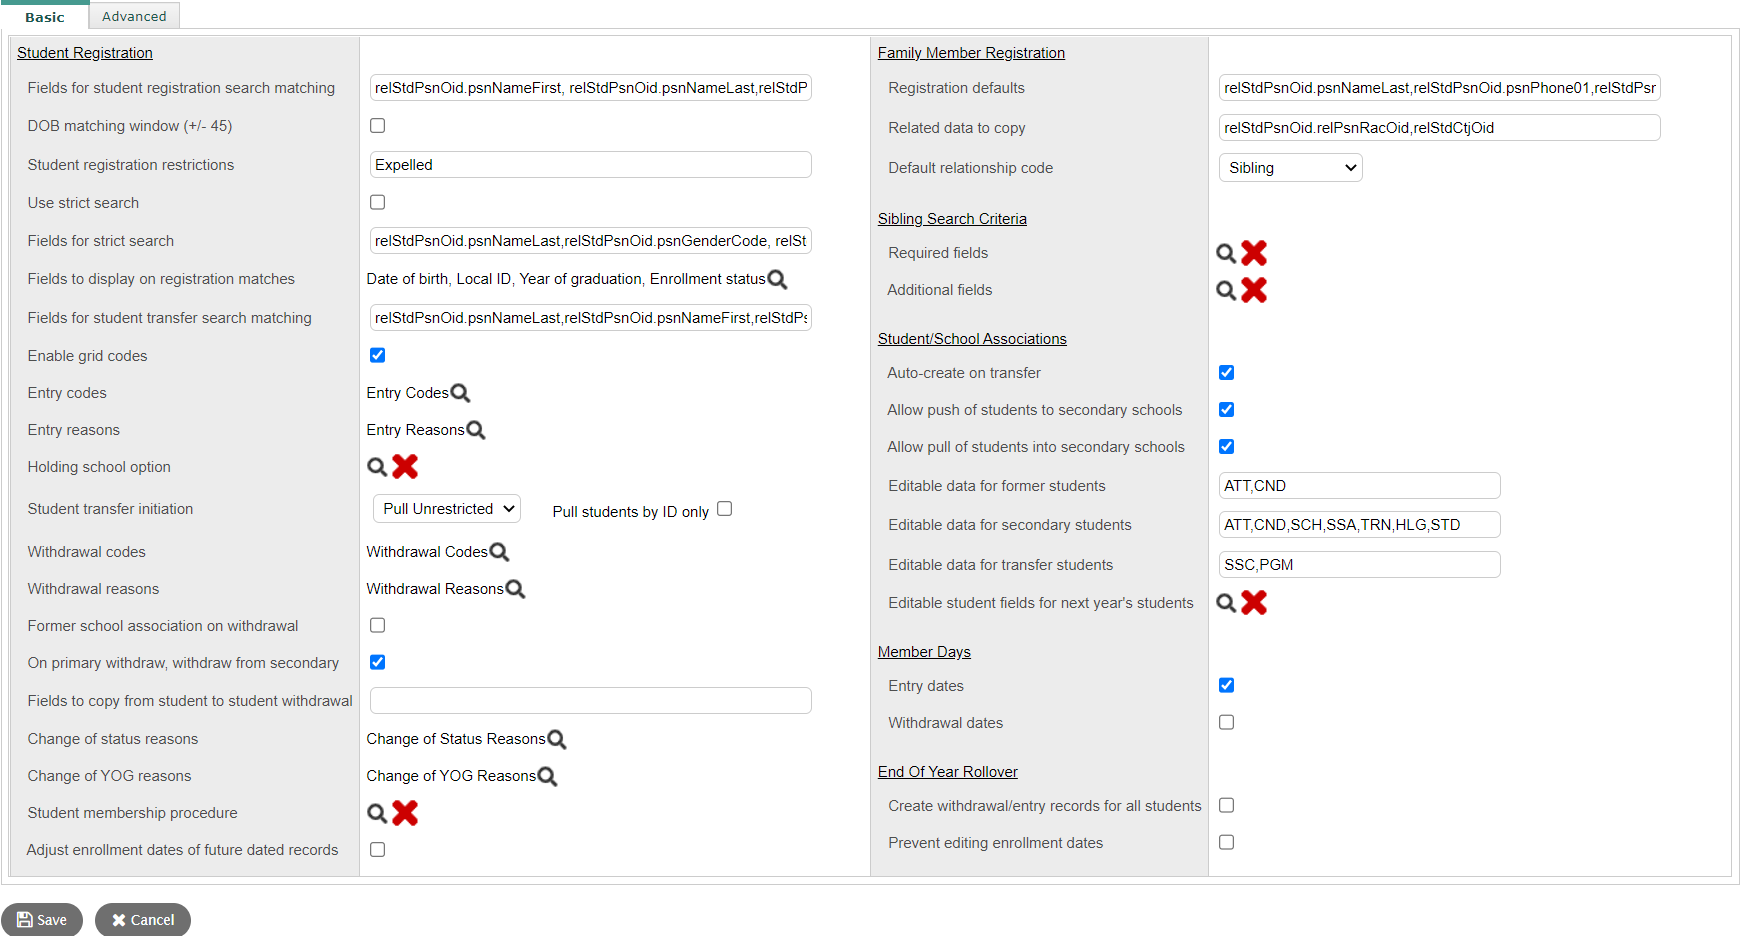
- Click the Category drop-down to select Membership. The Membership preferences page defaults to the Basic sub-tab.
-
- Use the following table to enter information in the fields:
-
Field
Description
Student Registration
Note: When a user attempts to register a student and enters a name and date of birth in the Student Registration wizard, Aspen searches the database for matches. The matches appear in a Student pick list for the user to review. The following fields affect the display of student matches.
Fields for student registration search matching
To help prevent duplicate student records when registering a new or cross-enrolled student, specify the fields that appear:
-
On the Select Student pop-up on Step 1 of the Student Registration wizard
-
On the Pull sub-tab of the Create Secondary School Associations wizard (if Allow pull of students into secondary schools is enabled)
DOB matching window (+/-45)
If you select this checkbox, the Student pick list will display students whose names match and whose birth dates are within 45 days of the birth date entered.
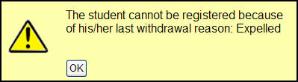
Student registration restrictions
The value in this field applies to returning students in your
For example, if you do not want a student who was expelled to be re-registered, type Expelled here. When a user tries registering the student, an error message appears.
You can set a user role, usually the Enro
Use strict search
If you select this checkbox, the Student pick list will only show exact matches to the fields specified at Fields for strict search in the Student Registration wizard.
Fields for strict search
Specify the fields that are required to match an existing student record when registering a student or creating a secondary school association. Fields to display on registration matches
Click
 to select the fields you want users to see if Aspen finds a match when they register a student. In the Student Registration wizard, a Student pick list shows the matching student’s name(s), and the fields selected here.
Fields for student transfer search matching
Specify the fields which appear in the Student pick list when transferring a student. Enable grid codes
Select this checkbox to enable the grid codes
 ranges of addresses within a city, town, or county feature. Your
 Entry codes
Click
to select the reference table you want users to reference when selecting values at this field.Entry reasons
Click
to select the reference table you want users to reference when selecting values at this field.Click
to see the School pick list. Select the school that serves as a "holding" school for students who will cross-enroContinuing education enrollment school
This field pertains to districts that use Aspen's Continuing Education feature. Click
to see the School pick list. Select the school that serves as a "holding" school for users who sign up for a Continuing Education course but do not have a:-
Primary school association (for example, they are not students in the district)
-
Status of Active or Active - No Primary.
When a student submits the Continuing Education class registration, Aspen will enroll them into the Continuing Education enrollment school as an Active student.
Student transfer initiation
Select one of the following to determine your
- Select Push to indicate that the school a student transfers out of must push the student’s record to the new school. The push automatically happens when the school performs the transfer.
- Select Pull to indicate that the school a student transfers into must pull the student’s record from the former school.
If you select Pull, the school a student transfers out of must indicate the new school can pull that student. To select a student, the school the student is leaving must select the Transfer pending checkbox, and select the student’s new school at the Transfer School Name field on the student’s detail page. Then, when the student’s new school clicks Transfer Student on the Options menu, that student’s name appears.
Note:
- Select Pull Unrestricted to indicate that a school can pull any student from another school in the
- Select Schedule to allow the sending school to schedule a transfer for a primary active student on a specific future date. A user at the sending school enters the student's receiving school, transfer date, and other information in the Student Transfer wizard. The Future Transfer procedure reviews the information and automatically transfers students from the sending school to the receiving school. This eliminates the need for a school user to manually pull the student into the receiving school. The student becomes Active at the receiving school on the transfer date.
Note: The receiving school can edit some data for future transfer students with the Editable data for transfer students field.
Pull students by ID only When the Student transfer initiation preference is set to Pull Unrestricted, this field appears next to the drop-down. When this checkbox is selected, users must enter a student's ID at the Local ID field when transferring a student (Student > Options > Registration > Transfer Student). Users cannot type a student's name, or select a student from a pick list, at the Name field. (The Name field becomes inactive.) Withdrawal codes
Click
to select the reference table you want users to reference when selecting values at this field.Withdrawal reasons
Click
to select the reference table you want users to reference when selecting values at this field.Former school association on withdrawal
Select this checkbox to create a former school association record when a student withdraws from a primary or secondary school. The record appears on the Student tab, Membership side-tab > Schools.
On primary withdraw, withdraw from secondary
If you select this checkbox, a cross-enro
If you deselect this checkbox, a cross-enro
Notes:
- You specify the
- Selecting this field will not automatically withdraw students from their secondary schools.
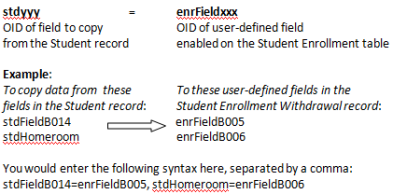
Fields to copy from student to student withdrawal
When a student withdraws from a school, you might want Aspen to retain some information from the Student record to the Student Enro
Change of status reasons
Click
to select the reference table you want users to reference when selecting values at this field.Change of YOG reasons
Click
to select the reference table you want users to reference when selecting values at this field.Student membership procedure
A custom Student Membership procedure is necessary to use this preference. The procedure can be used for validation or to trigger an action after a specified event occurs in Aspen (such as when a student's
Contact Aspen Technical Support to enter a service request for a custom procedure.
Adjust
When you change a student's
This preference can be used if your
- Withdraw all students on the last day of school, and
- Re-enro
For example:
- You use the End-of-Year Rollover to withdraw all students on the last day of school, June 30 (creates withdraw record).
- When running the End-of-Year Rollover, you also re-enro
- A student moves out of your
- Aspen changes the existing September 1st
Family Member Registration
Registration defaults
Type the fields that you want copied to the new student from the existing family member when registering a new student as a family member.
Related data to copy
Identify the related data you want the system to copy from the student you select when registering a new family member (such as race or student contacts).
Default relationship code
Select the relationship code you want to default in the Relationship code field when registering a new family member.
Sibling Search Criteria
Note: These fields affect the student matches that Aspen makes and displays on a Student Pick List when a user registers a student with the Student Registration wizard and selects the New family member checkbox.
Required fields
Click
to select any required fields a user must enter when they select New family member in the Student Registration wizard. This limits the student matches that will appear on the Student pick list.
Additional fields
Click to select any required fields a user must enter when they select New family member. This limits the student matches that will appear on the Student pick list.
Note: Aspen will search the database for student matches based on the information specified here, as well as the strict search criteria (last name, gender, and date of birth), if the Use strict search preference is selected.
Student/School Associations
Auto-create on transfer
Select this checkbox if you want to associate students with their previous schools when they transfer to another school in your
Allow push of students to secondary schools
If you select this checkbox, your school will “push” a student’s record to another school in the
If you select this checkbox, a secondary school in your
Editable data for former students
The prefixes that represent the tables of information that can be edited for former students appear. You can add to or delete from this list. Enter the tables a former school can edit for a former student (a student who transferred to another school within the
The prefixes that represent the tables of information that can be edited for secondary students appear. You can add to or delete from this list. Enter the tables a secondary school can edit for a secondary student (a student who attends another school, such as a vocational school for some classes).
Editable data for transfer students Prefixes entered here represent tables of information that can be edited at the receiving school for incoming student transfers (for organizations that schedule student transfers). The defaults are the Student Schedule table, SSC, and the Student Program Participation table, PGM. With the exception of the tables defined here, future students' detail information is read-only at the receiving school until the transfer is completed. Editable student fields for next year's students
Click
to see the Data Field Config Attribute pick list. Select the field(s) you want to allow school users to edit for their incoming students. These fields are from the Student table. Users must have the appropriate privileges to edit the field(s) specified here.Example: A high school clerk might need to edit the Next Homeroom field (on the student details page) for eighth-grade middle school students who will attend high school in the fall.
Member Days
Note: The checkboxes you select also affect student transfers between schools.
Select this checkbox if you want to include the date a student enro
Withdrawal dates
Select this checkbox if you want to include the date a student withdraws from a school in your
End of Year Rollover
Create withdrawal/entry records for all students
Select this checkbox to add a section to Step 3 of the End-of-Year Rollover wizard that allows users to create Withdrawal and Entry records for students who are staying in the same school next year, but are being promoted to the next grade level.
For example, all ninth grade students might have a Withdrawal record in June from the high school, and an Entry record for 10th grade in September at the high school.
Prevent editing
Select this checkbox if you do not want users to be able to edit the dates that default in the Withdrawal and Entry date fields in the Withdraw and enro
Warning: Do not select this checkbox if your state reports are configured to report entry and withdrawal records for returning students.
-
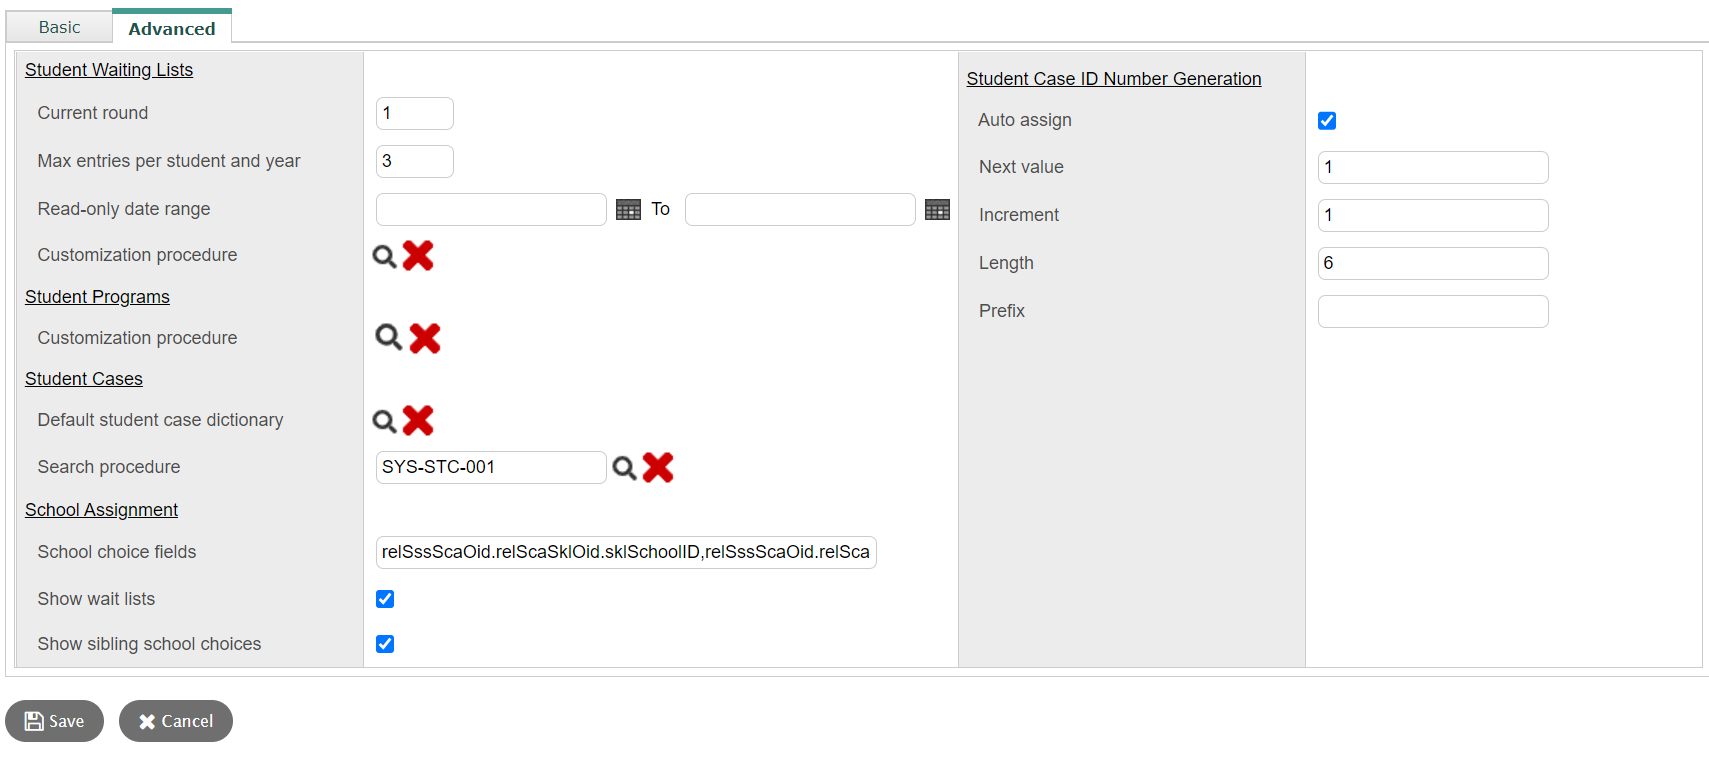
- Click the Advanced sub-tab.
-
- Use the following table to enter information in the fields:
-
Field
Description
Student Waiting Lists
Current round
Type the number of the current round of student waiting lists.
Max entries per student and year
Type the maximum number of entries each student is allowed per year.
Read-only date range
Click
 , and then select the date range for the waiting lists.
Customization procedure
Click
, and then select a customization procedure for waiting lists.
Student Programs
Customization procedure
Click
, select a customization procedure for Student Programs, and click OK. Student Cases
Default student case dictionary
Click
, select the default extended Data Dictionary to be used for student cases, and then click OK.
Search procedure
Click
to select a search procedure for student cases.
School Assignment
School choice fields
Type the fields that default when a student or family member identifies their school choices.
Show wait lists
Select this checkbox to show wait lists.
Show sibling school choices
Select this checkbox to show sibling school choices.
Student Case ID Number Generation
Auto assign
Select this checkbox to have Aspen automatically assign ID numbers to the student case workflows. To manually assign ID numbers, do not select this checkbox.
Next value
Type the amount by which the ID numbers are to increase.
For example, if you set the Next value to 5 and the Increment to 5, the numbering sequence of the ID numbers will be: 5, 10, 15, 20,….
Increment
Type the amount by which the ID numbers are to increase.
Length
Type the number of digits of the ID number. For example, for ID numbers of five digits (00000), type 5.
Prefix
Type the prefix to begin all ID numbers with. For example, for ID numbers beginning in 1, (10000, 10001, 10002), type 1.
- Click Save.