Register a student
Register students in your
|
Note: Aspen's New Student (Online) Registration add-on feature lets parents register their students remotely, without paper forms, and sends the data directly to the registrar for review. Contact your sales associate for more information. |
To register students:
- Log on to the
- Select Student > Options > Registration > Register Student. Step 1 of the Student Registration wizard appears.
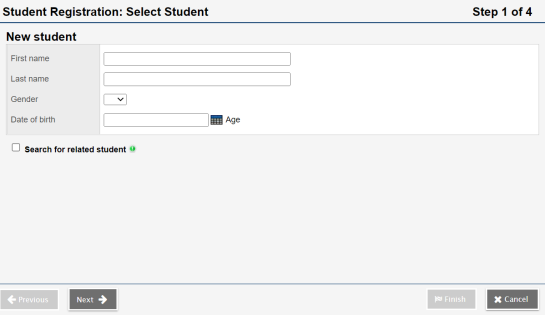
- Type the student’s First name and Last name, select a Gender, and type or click
 to enter a Date of birth.
 - Do one of the following:
- If this student is not related to another student in the
- If this student is related to another student in the
- Select the Search for related student checkbox. Additional fields appear.
- Enter any required fields (determined by your root organization’s preferences).
- Type a name at the Related student field, and then click Search.
- In the pick list, find the related student, and then click OK.
- Select the Relationship to the student you are registering (such as sibling).
- Click Next.
Note: When you select a Related student, any information (such as phone number and address) your -
-
If...
Then...
This student is a returning student (meaning he or she was active in your
Use the same registration process as for a new student.
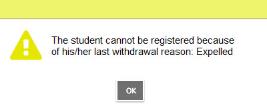
This student withdrew from your
A warning message might appear.
System administrators can set a user role, usually theA user enters the name of an active "private" student
Aspen will find a match but will not show the user any details about the student or allow the student to be enro
The information you entered matches another student in the district (including students with primary, secondary, or former
The Matching Student Found pop-up lists any student(s) whose information matches what you entered. (The select criteria specified in your organization's membership preferences determine the matching student results that appear.)
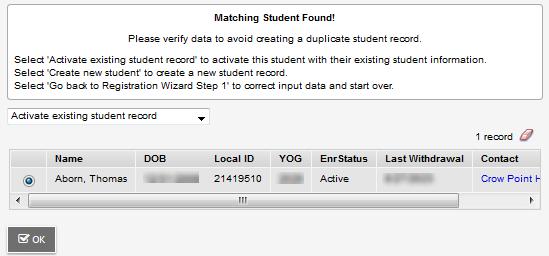
To avoid creating a duplicate record, compare the information you entered to the student matches. Then select one of the following from the drop-down:- Activate existing student record to activate a student who is already in Aspen. The "Student Registration: Select Student" page displays a warning that the student is already active.
Below the warning, demographic information for the active student who matches your data appears. You cannot register a student who is already active in Aspen. Do one of the following:
- Click OK to return to Step 1 of the wizard.
- Click Cancel to exit the wizard.
- Edit your data under New Student. Click Next to proceed to Step 2 and register a new student.
- Create a new student to proceed to Step 2 of the wizard. Enter the new student's demographic data, and then create a new student record.
- Go back to Registration Wizard Step 1 to edit the data you entered and continue with the registration, or press Cancel to exit the wizard.
- Activate existing student record to activate a student who is already in Aspen. The "Student Registration: Select Student" page displays a warning that the student is already active.
- Click Next. The Student Registration wizard
displays Step 2.
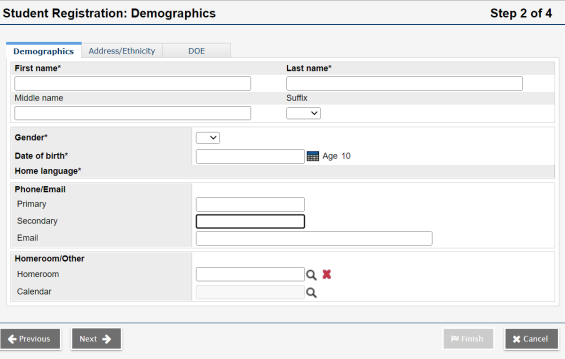
- Enter general demographic information for the student.
- Click the Address/Ethnicity tab to enter the student’s
address information. Type the address, and then click the Validate Format icon
 (if available) to validate the address format.
Note: Other tabs may appear in Step 2 of the wizard, depending on your district's settings. Click each tab and enter the information as needed. - Click Next.
The Student Registration wizard displays Step 3.
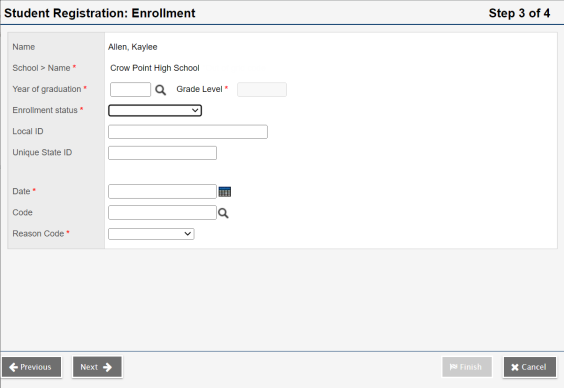
- Type or select the
student’s
Notes:
- If you are using the School view to register a student, the school you are currently logged on to automatically appears in the School Name field.
- If you are using the
- At Year of graduation, you can manually enter the student's YOG or click
 to view YOGs and their corresponding grade levels (for the current and next school year) on the pop-up. These values are scoped to the selected school. At Filter, click All grades to view all YOGs.
 - Aspen can auto-generate the student's
- Depending on the
- The Code is the
- Click Next.
The Student Registration wizard displays Step 4.
Note: If the student is enro - Click Finish
to register the student. Staff members can now enter demographic information and create a schedule for the student.
Note: If you do not see the student in the Student List after exiting the Student Registration wizard, click
 , and then select All Records (if logged on to the