Mass Update
Use a mass update to permanently change one set of values to another set of values for the same field. For example, maybe all of the students in Homeroom 101 are being switched to Homeroom 14.
It is possible to mass update a field with another field or an expression. For those, you need to perform an Advanced Mass Update.
|
Note: Before you perform a mass update, you must select the records you want to work with. If you neglect to do this, you might accidentally mass update all of the records in your database. |
|
Important: It is not possible to reverse a mass update. Proceed with caution. |
To use the Mass Update option:
- Go to any list page, such as the Student List.
- Select the records you want to mass update by doing one of the following:
- Select their checkboxes and then from the Options menu, select Show Selected.
- Use a query.
- Use a snapshot.
-
Note: Be sure to check the record counter to verify that it lists the correct number, such as
 if you selected
25 records.
if you selected
25 records.
- From the Options menu, click Mass Update. The Mass Update pop-up appears.
-
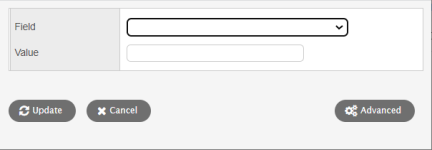
- Use the Field drop-down to select the field whose value you want to replace, such as Homeroom.
-
Note: If the field that you want to mass update does not appear as a selection here, it may not be enabled for mass update.
- Type or select the Value to replace the existing value. For yes/no fields, such as Include in Honor Roll, a checkbox appears. Select the checkbox to indicate a value of true or yes. Deselect the checkbox to indicate a value of false or no.
- Click Update.
- The system confirms the field and value that you selected. Click OK or Cancel.
- If you clicked OK, the system confirms the number
of records that will be affected and asks if you want to continue.
Click OK to complete the mass
update or Cancel to cancel
the operation.
Note: When the Attendance activity tracking preference is enabled by the
- If an override reason is required for modifying the records selected for Mass Update, then the Override Reason and Activity Comment fields appear on the Mass Update pop-up. Select an override reason for Aspen to save any edits in Mass Update. If you select Other, enter an Activity Comment to describe the reason. The selected override reason and activity comment will apply to all records that are updated.
Note: Users who have the Override archive lock date privilege enabled can edit archived records by selecting Force save in Advanced Mass Update (Options menu > Mass Update > click Advanced).
|
Example: If a user who does not have the Override archive lock date privilege runs Mass Update, Aspen skips the records with dates prior to the Archive lock date. If the system administrator, whose role has that privilege enabled, runs Advanced Mass Update and selects Force save, Aspen will update all the records, including the archived ones. Mass Update skips records that are read-only or that do not pass validation. |