Advanced Mass Update with an Expression
Use an Advanced mass update![]() permanently change one set of values to another set of values for the same field when you
need to permanently update a field with an expression. Doing so can reduce
your workload. For example, one Advanced mass update can produce the same
results as two queries and two simple mass updates. Expressions also permit
updates that just are not available any other way.
permanently change one set of values to another set of values for the same field when you
need to permanently update a field with an expression. Doing so can reduce
your workload. For example, one Advanced mass update can produce the same
results as two queries and two simple mass updates. Expressions also permit
updates that just are not available any other way.
An expression is a string that can contain a mix of variable and literal
tokens. Variable tokens are enclosed in braces ('{' and '}') and contain
a period-delimited string of accessors (accessors are referenced by the
Java name, which can be found in the Data Dictionary![]() organizes the tables and fields that house all of your district's administrative information).
A variable token might also contain a function and parameters for that
function. Literal tokens are any portions of the expression that are not
variable tokens. The following is an example of an expression:
organizes the tables and fields that house all of your district's administrative information).
A variable token might also contain a function and parameters for that
function. Literal tokens are any portions of the expression that are not
variable tokens. The following is an example of an expression:
{person.lastName}, {person.firstName}
This expression could be parsed into the following list of tokens:
The final result might be a value like "Doe, John".
|
Note: Before you perform an advanced mass update, you must select the records you want to work with. If you neglect to do this, you might accidentally mass update all of the records in your database. |
|
Important: It is not possible to reverse a mass update. Proceed with caution. |
To use the Advanced Mass Update option:
- Go to any list page, like the Student List.
- Select the records
you want to mass update by doing one of the following:
- Select their checkboxes and then from the Options menu, select Show Selected.
- Use a query.
- Use a snapshot.
Note: Be sure to check the record counter
 at the
top of the page to verify that it shows the correct number. Regardless
of what records are selected, performing a mass update will always update
the total number of records. If the record counter shows "100 of
750 selected," you will update 750 records if you forget to do Options > Show Selected.
at the
top of the page to verify that it shows the correct number. Regardless
of what records are selected, performing a mass update will always update
the total number of records. If the record counter shows "100 of
750 selected," you will update 750 records if you forget to do Options > Show Selected.
- From the Options menu, click Mass Update. The Mass Update pop-up appears.
-

- Click Advanced. The Mass Update pop-up expands.
-
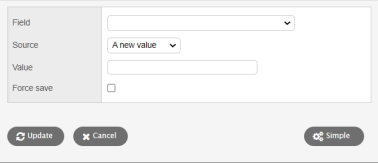
- Use the Field drop-down to select the field whose value you want to replace.
- Use the Source drop-down to select An expression.
- In the Value field, enter an expression of literal and/or variable tokens.
- Select the Force save checkbox to override the validation of required or restricted fields during the mass update process. If you do not select this checkbox and a record has validation errors, then it will not be saved.
- Click Update. The system confirms the field and value that you selected.
- Click OK or Cancel.
- If you clicked OK, the system confirms the number of records that will be affected and asks if you want to continue. Click OK to complete the mass update or Cancel to cancel the operation.
|
Note: Some mass update operations can take several minutes to complete if the number of records to be updated is several thousand or more. |
Simple Examples
- To populate a new, user-defined field on the Student table so that it holds every student’s full name in the format ”First Middle Last” (for the purposes of running a Quick Report or customizing labels, for example), use the following syntax in the Expression box:
{person.firstName} {person.middleName} {person.lastName}
- A school has just completed construction on a new wing. All current room numbers need to be prefixed with the letter ’A’ to indicate the A wing:
A{roomNumber}         (the
 value for room number is appended to the literal 'A')
Note: An operation like this is best performed using a temporary, user-defined field:
- Enable a user-defined field called New Room in the Data Dictionary on the School Classroom table.
- Mass update the New Room field with the above expression.
- If successful, mass update the Number field using the Another Field option (copying from another field eliminates the risk that is inherent in using expressions).
- Reset the temporary New Room field in the Data Dictionary so it can be used again later.
Variable Token Functions
Variable tokens can also include functions to manipulate the resulting value. Functions are delimited with parentheses followed by a list of arguments. The supported functions are outlined in the following tables:
|
Note: Variables are case-sensitive; function names are not. |
|
Function |
LOWER(fieldName) |
|---|---|
|
Description |
This function converts all letters in a string to lowercase. |
|
Parameters |
fieldName – the accessor to evaluate |
|
Example |
From the Student List, you could use this expression to convert all middle names to lower case: {LOWER(person.middleName)} The name Charles would become charles. |
|
Function |
UPPER(fieldName) |
|---|---|
|
Description |
This function converts all letters in a string to uppercase. |
|
Parameters |
fieldName – the accessor to evaluate |
|
Example |
From the Student List, you could use this expression to convert all middle names to upper case: {UPPER(person.middleName)} The name Charles would become CHARLES. |
|
Function |
PROPER(fieldName, allWords) |
|---|---|
|
Description |
This function converts the first letter of a word to uppercase and the remaining letters to lowercase. |
|
Parameters |
fieldName – the accessor to evaluate allWords – either true or false. If true, then all words in the value will be capitalized. If false, then only the first word will be. |
|
Example |
From the Course List, you could use this expression to convert all course names to proper case: {PROPER(description, true)} The course name INTRODUCTION TO PHOTOGRAPHY would become Introduction To Photography. {PROPER(description, false)} The course name INTRODUCTION TO PHOTOGRAPHY would become Introduction to photography. |
|
Function |
PADL(fieldname, length, ’padCharacter’) |
|---|---|
|
Description |
This function adds enough pad characters to the left of the string (a prefix) to reach the specified length. This is typically used for alignment purposes. |
|
Parameters |
fieldName – the accessor to evaluate length – the final, padded length of the string padCharacter – the single character used for padding, this value must be wrapped in single quotes (e.g., ' ' or '0') |
|
Example |
From the Student List, you could use this expression to right-align grade levels: {PADL(gradeLevel, 2,’0’)} Before: 7 8 9 10
After: 07 08 09 10 |
|
Function |
PADR(fieldname, length, ’ |
|---|---|
|
Description |
This function adds enough pad characters to the right of the string (a suffix) to reach the specified length. This is typically used for alignment purposes. |
|
Parameters |
fieldName – the accessor to evaluate length – the final, padded length of the string padCharacter – the single character used for padding; this value must be wrapped in single quotes (e.g., ' ' or '0') |
|
Example |
From the Course List, you could use this expression to align course numbers and descriptions: {PADR(number,5,’ ’)} {description}
Before: 123 Cooking 101 1750 Chemistry 24689 History
After: 123 Cooking 101 1750 Chemistry 24689 History |
|
Function |
IF(fieldName, operator, ’ |
|---|---|
|
Description |
This function represents a conditional evaluation. If the condition evaluates to true, then one value is output; otherwise, the other value is output. |
|
Parameters |
fieldName – the accessor to evaluate operator – one of the following values: equals equalsIgnoreCase notEqualTo notEqualToIgnoreCase contains beginsWith endsWith isEmpty comparedValue – the test value used for comparisons, this value must be wrapped in single quotes trueResult – the resulting value if the condition evaluates to true falseResult – the resulting value if the condition evaluates to false |
|
Example |
From the Student List you could use this expression to set calendar codes:
{IF(gradeLevel,equals,’12’,’Senior’,’Standard’)} |
|
Notes: When the Attendance activity tracking preference is enabled by the
|