Enter or view student contact information
Enter or view contact![]() an adult you can contact regarding a student's academic or personal information
information for each student.
an adult you can contact regarding a student's academic or personal information
information for each student.
It is best to enter the contact information (and when applicable, share the contact among students) when first entering a student's details. If that is not possible, you can always enter and share the contact at a later time.
To enter or view contact information for a student:
- Log on to the
- Select Student > search for and select the student > Contacts. The student's Contacts page appears.
- Do one of the following:
- To view information for an existing contact, select the contact, and then click Details on the side-tab.
- To add a new contact, select Options > Add. The New Student Contact page appears.
- If adding a contact, in the Last
Name field, type a contact name. If the contact name already
exists in the system and there are fewer than 100 matches, a pick list with the matching name(s) appears. Select a name. If there are more than 100 matches for the name or you want to enter additional search criteria, click
 . One of the following pop-ups appears, depending on your
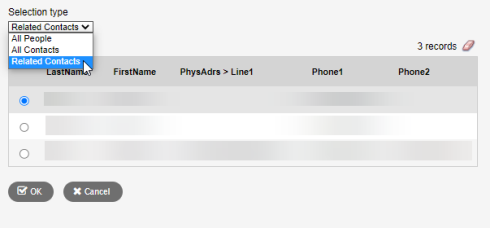
 - In the Selection Type pop-up, indicate whether Aspen should display Related Contacts, All People or All Contacts. Make your selection, and then click OK.
-
- The Optional Search Parameters pop-up appears if your
-
Note: Depending on your Notes:
- If you select a contact already entered for another student, the contact is shared.
- The information shared for that contact automatically appears in the Shared Contact Information portion of the page. If you update or edit this shared contact information, the system updates the information for all students who share that contact.
- Click
 to see the other students associated with this contact. Click
Clear to stop sharing this
contact with other students.
to see the other students associated with this contact. Click
Clear to stop sharing this
contact with other students. - Customize your preferences for the contact with the following fields:
-
Reference table
Description
Emergency priority
Enter a number to indicate the contact’s priority. 0 is considered the highest priority. In case of an emergency, the contact with an emergency priority of 0 will be contacted first, 1 will be contacted second, and so on.
Relationship
Click this drop-down to select the contact’s relation to the student.
Contact lives with student
Select this checkbox if the contact lives with the student.
Receive
Select this checkbox if the contact is mailed the student’s
Note: When teachers run a Progress Report for a single student, they can email it to specific recipient(s) in the last step of the Progress Report wizard. A teacher could send this contact a Progress Report if they have a primary email address, and Receive email and this field are enabled. Receive
Select this checkbox if the contact is mailed the student’s
Receive other mailing
Select this checkbox if the contact is mailed some other notification regarding the student.
Select this checkbox for the contact to receive email notifications about the student.
Note: When teachers run a Progress Report for a single student, they can email it to specific recipient(s) in the last step of the Progress Report wizard. A teacher could send this contact a Progress Report if they have a primary email address, and Receive Select this checkbox for the contact to access this student's information in the Family portal. Portal access is usually reserved for the student's parents or guardians.
Note: If your Student Contact table does not have this field, add it to the template and a field set. For this contact to receive email notifications, this checkbox and the Receive email checkbox (above) must be enabled, and the student must have an
Example: A parent chooses to receive an email notification when their student receives a low
- Click Save.
| Note: In the Staff view, you can only view – not edit – contact information. |
|
Important: Your system might have duplicate records for contacts. If so, you must identify the records that are duplicates, and use the For example, Leah
Abraham, a parent of two children in the |