Define details for user security roles
In the
|
Notes:
|
Defining a role means determining the data that those users can access and the privileges users have with the data.
To create a role and define its details in the
- Log on to the
- Select Admin > Security.
- Select Options > Add. The New Security
Role page appears.
-
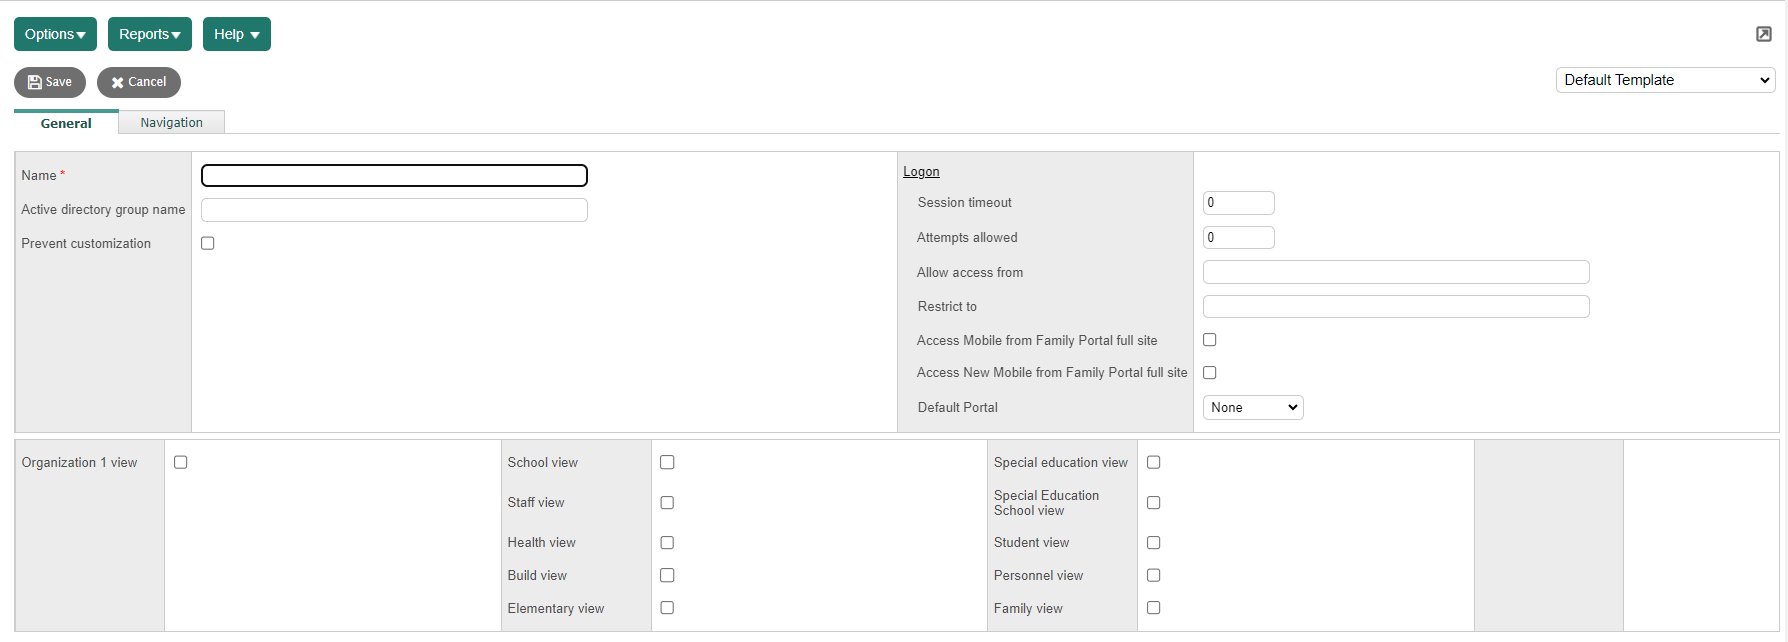
- Use this table to enter information in the top section of the General sub-tab:
-
Field Description Name
Type a name for the user role.
Active directory ou (organization unit) name
Type the name of the organizational unit (OU) that represents this user role in the Active Directory.
Example: Type Staff for all teachers and instructors in the group. Prevent customization
(
Select this checkbox to prevent users at Logon
Session timeout
Type the number of minutes users with this role can be idle in the system before Aspen automatically logs them off. If you enter 0 or leave this field blank, Aspen uses the value defined in the Security preferences for the
Note: You can define a value for individual users that overrides this value. Attempts allowed
Type the number of consecutive times users with this role are able to type an incorrect password without being locked out of the system. If you enter 0 or leave this field blank, Aspen uses the value defined in the Security preferences for the
Note: You can define a value for individual users that overrides this value. Allow access from
Type the IP addresses or domain names from which users with this role can log on to Aspen.
If you enter:
Result:
Single address
User's location must match this to log on to Aspen using this role.
Multiple addresses separated by a comma
User's location must match one of these to log on to Aspen using this role.
Partial IP addresses, and multiple partial IP addresses
User's location must match the beginning portion or end portion of these to log on to Aspen using this role.
Nothing
User's location must match the value defined in
Users with this role are able to access Aspen from these locations only. When the user logs on and the user's location does not match what is entered here, Aspen displays Invalid login. If you leave this field blank, Aspen uses the value defined in the Security preferences for the
Note: You can define a value for individual users that overrides this value. Restrict to
Type the IP addresses or domain names from which users with this role can log on to Aspen and have the privileges associated with this user role. This is useful when a user has multiple roles, and you want to restrict the roles to specified locations, such as school or home.
If you enter:
Result:
Single address
User's location must match this to log on to Aspen using this role.
Multiple addresses separated by comma
User's location must match one of these to log on to Aspen using this role.
Partial IP addresses, and multiple partial IP addresses
User's location must match the beginning portion or end portion of these to log on to Aspen using this role.
Nothing
User's location must match the value defined in the
Users with this role are able to access Aspen from these locations only. When the user logs on and the user's location does not match what is entered here, Aspen displays This account does not have access to the system.
If a user has multiple roles and this field has an entry, only roles that are valid according to these restrictions are allowed. For example, a user with a Family role and a Staff role may be restricted to specified locations for accessing Aspen. The Staff role may be defined so the user is only allowed to log on to the Staff view from school. When the user logs on from home, they are only allowed access to the Family view.
Note: You can define a value for individual users that overrides this value. Access Mobile from Family Portal full site
Select this checkbox for Family portal users to get a link to Aspen Mobile when they log on to Aspen full site view from a desktop or laptop.
Note: This feature requires that the user security role has the Family view selected. Access New Mobile from Family Portal full site Select this checkbox for a Mobile View tab to appear in the Family portal in Aspen desktop. Users click the Mobile View tab to access Aspen Go. Default Portal This field specifies whether users on an Aspen desktop device are directed to Aspen Go or Classic mobile.
Select one of the following:
-
Blank: The preference is off.
-
Classic: The preference is on and takes the user to the old mobile experience.
-
New Mobile: The preference is on and takes users to Aspen Go.
Notes:
- This field only applies to views that have Aspen Go or Aspen Go app access (Family or Student). Other views will default to Classic mobile.
- This feature requires that the user security role has the Family or Student view selected, and the user's Default view is Family or Student.
- If a user has more than one role, at least one of the roles has this field enabled, and the user's Default view is Family or Student, then the user will automatically go to Aspen Mobile when they log on.
Views
Select the checkboxes to determine the views users with this role have access to.
-
- In the Security Access
section of the page, the Category
column displays categories from the Data Dictionary
 organizes the tables and fields that house all of your district's administrative information.
The System Table
column displays Data Dictionary tables within the category. For example,
for the
organizes the tables and fields that house all of your district's administrative information.
The System Table
column displays Data Dictionary tables within the category. For example,
for the Note: To filter a set of criteria to selectively screen out incoming information, such as "all active students" or "former students" the table list to tables in a specific
category, select a category from the Category
drop-down in the top-right corner of the list.
- Use this table to determine the checkboxes to select for each Data Dictionary table:
-
Privilege Users with this role can: C - Create Create new records in this Data Dictionary table. This privilege determines if the Add option appears on the Options menu. R - Read View information in this Data Dictionary table. This privilege determines if a page is visible. U - Update Update existing records in this Data Dictionary table. This privilege determines if the Save button appears on pages. D - Delete Delete records in this Data Dictionary table. This privilege determines if the Delete option appears on the Options menu. G - Global access Gives user access to an unfiltered list of records for any table in the Aspen database that they have privileges for. M - Mass Update Update several records on a list. This privilege determines if the Mass Update option appears on the Options menu.
Other Some roles need to perform tasks that require extra privileges. The Other column displays additional access and privileges users have with the data for some areas. Select a checkbox to give the role access to the specific data or action. Deselect a checkbox to restrict access to the data or action. Example: An
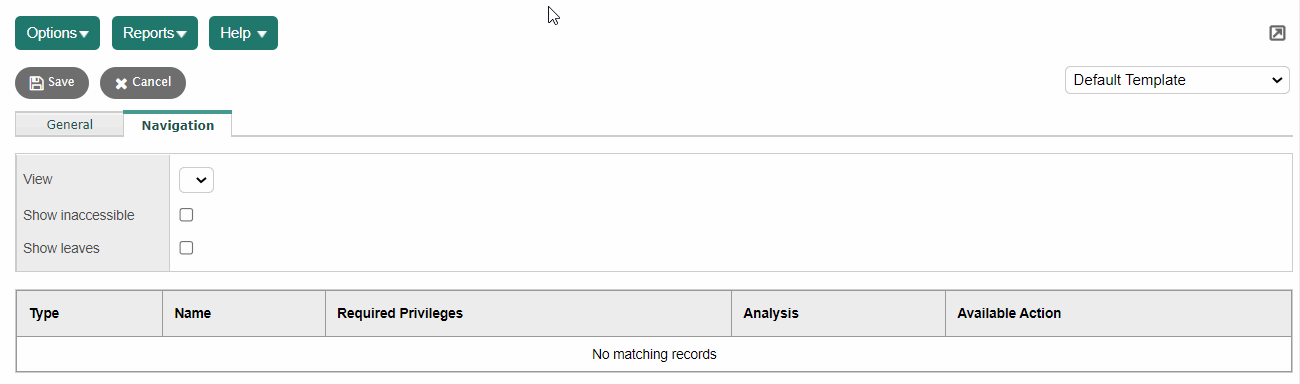
- At the top of the page, click the Navigation sub-tab. The navigation privileges appear.
-
|
Note: To quickly select all checkboxes, click [all] next to the table. To quickly deselect all checkboxes, click [none] next to the table. |
- Use this table to fill in the fields:
-
Field
Description
View
Select the view for which you want to see this role’s access to tabs and side-tabs
column of buttons of the left side of the Aspen user interface.
For example, you can examine the pages the guidance counselor
role can access in the School view. This is a quick way to see
all the areas in a view that a role has access to.Show inaccessible
The page automatically displays the areas the role has access to. To see all areas in the view, select this checkbox.
Show leaves
To view the role's access to any sub-tabs (leaves) available on side-tabs, select this checkbox.
Available Action
Do one of the following:
- To remove a role's access to a tab or side-tab, click Remove in this column.
- To reinstate access to the tab or side-tab, select the Show inaccessible checkbox at the top of the page, and click Add in this column.
- Click Save. Now, you can either assign several users to this role, or you can assign this role to one user.
You can easily allow a user to create announcements on Aspen's homepage by adjusting the Security Access options for the user's role.
|
Note: Using two browsers is a great way to save page refreshes. If the changes you are making require you to log out and back in again, you can use another browser. You cannot have two windows open in the same browser, but you can have the same view open in two different browsers. |
| Example: Say you want to edit the security access for a particular role. You make your changes in the |