Define District (Root Organization) and Intermediate Organization Security preferences
Define security
preferences for your
To define security preferences:
- Do one of the following:
- For the
- For
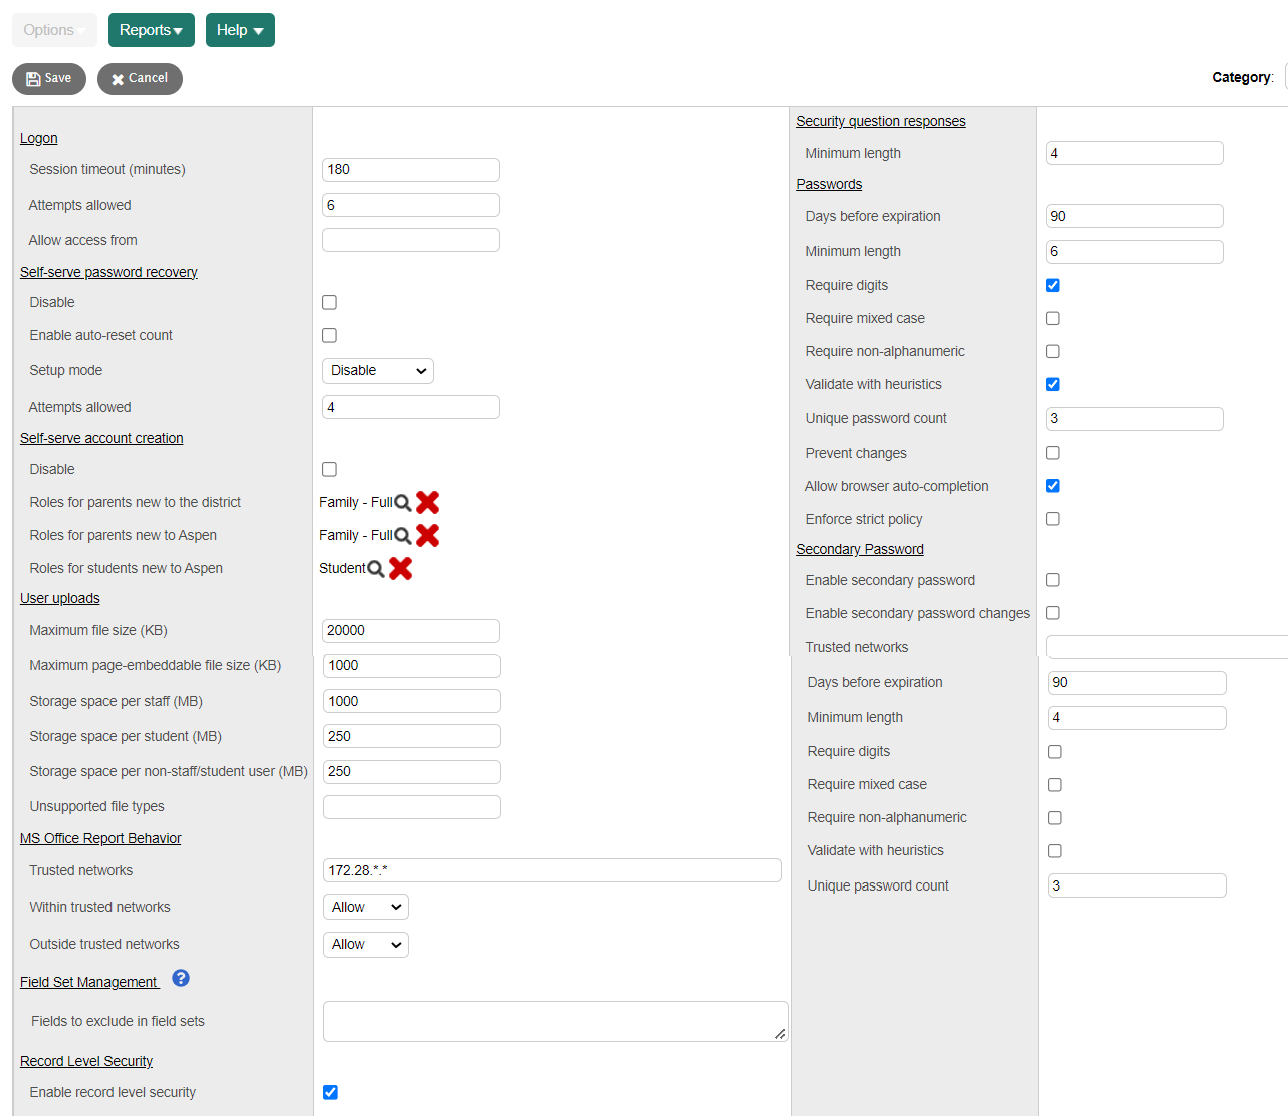
- Use this table to enter information on the page:
-
Note: Some of these preferences only apply to the
Field Description Default value Logon
Session timeout (minutes)
Type the number of minutes that a user can remain idle in the system before being automatically logged off.
Note: You can define a value for individual users or user roles that overrides this value.
15
Attempts allowed
Type the number of times a user in your organization can attempt to log on to Aspen before the system disables the account. An error message appears if the user tries to log on to the system again.
Note: To enable an account disabled due to excessive logon attempts, go to the User Details page.
You can define a value for individual users or user roles that overrides this value.5
Allow access from
Type a list of allowed IP locations. Separate each IP location by a comma. If you leave this field blank, the system assumes all IP locations can access the server.
Note: You can define a value for individual users or user roles that overrides this value. Blank
Self-serve password recovery
Note: These fields only appear in the Disable
Do one of the following:
- To turn automated password recovery off, select this checkbox.
- To use automated password recovery, deselect this checkbox.
Deselected
Enable auto-reset count
Select this checkbox to re-enable the account of a user who has successfully reset their password. Deselected
Setup mode
If you deselect the Disable checkbox (above), do one of the following to determine how users set up their password recovery:
- Select Disable if you want users to proactively access the Security tab on the Set User Preferences pop-up to enter recovery information.
- Select Don’t require if you want the system to automatically display the Security Preferences Update pop-up when users log on. Users can either enter the information, or click Later to do it later. The pop-up appears every time the user logs on until they complete the information and click Submit.
- Select Require if you want the system to automatically display the Security Preferences Update pop-up when users log on. Users are required to enter the information, and click Submit in order to use the system.
Disable
Attempts allowed
Type the number of times a user can attempt to enter the email address, question and answer in order to log on when recovering their password.
3
Self-serve account creation
Note: These fields only appear in the Disable
Select this checkbox if you want to disable self-serve account creation for families and students.
Note: If you disable self-serve account creation, parents and students do not see the "Request an account" link on the Aspen login screen. Selected
Roles for parents new to the
Click
 . The Security Role Pick List appears. Select the user roles that are allowed to self-create this type of account.
 Family
Roles for parents new to Aspen
Click
. The Security Role Pick List appears. Select the user roles that are allowed to self-create this type of account.Family
Roles for students new to Aspen
Click
. The Security Role Pick List appears. Select the user roles that are allowed to self-create this type of account. Student
User uploads
Note: These fields only appear in the Maximum file size (KB)
Type the maximum file size (in kilobytes) for a user's uploaded file.
20,000
Maximum page-embeddable file size (KB)
Type the maximum file size (in kilobytes) allowed to be inserted onto a Page.
Note: This typically applies to image files. 1,000
Storage space per staff (MB)
Type the amount of storage space (in megabytes) that each staff member is allowed to upload via the Group Resources widget/My Resources.
1,000
Storage space per student (MB)
Type the amount of storage space (in megabytes) that each student is allowed to upload via the Group Resources widget/My Resources.
100
Storage space per non-staff/student user (MB)
Type the amount of storage space (in megabytes) that each non-staff/student user (such as a coach) is allowed to upload via the Group Resources widget/My Resources.
250
Unsupported file types
Type the extensions you want to exclude from uploads. This preference affects the following areas:
- Student Locker
- Staff Planner
- Staff
- Student Portal > To Do widget
- Email attachments
Note: Do not include a period before the extension, and use a comma to separate extension names. For example, you might type bat, exe, dll. If this preference is not populated, then all file types can be imported into Aspen.
No file types excluded by default MS Office Report Behaviorr
Trusted networks
Type a list of IP locations that are allowed to access reports in the formats listed above. Separate each IP location by a comma.
If you leave this field blank, the system assumes all IP locations use the "Outside trusted networks" preference.
Blank
Within trusted networks
Click this drop-down to determine how the report options behave when accessed from a trusted network:
- Allow: The report formats listed above are provided as options to the user when running reports, and the reports automatically appear.
- Prompt: The report formats listed above are provided as options to the user when running reports.
Selecting I understand the risks, continue displays the report.
Selecting Cancel when using Quick Print stops the report from being run.
Selecting Cancel when running reports from the Reports menu, exports, and scheduled jobs closes the warning message.
Selecting This is a computer I use frequently, remember my decision stores the decision as a cookie. If Cancel is selected, the report formats are no longer options when running reports. The user must delete the cookie to reverse this decision. If Continue is selected, the warning will not display when these report types are run.
- Disallow: The report formats listed above are not provided as options to the user when running reports.
Allow
Outside trusted networks
Click this drop-down to determine how the report options behave when accessed from a non-trusted network:
- Allow: The report formats listed above are provided as options to the user when running reports, and the reports automatically appear.
- Prompt:
The report formats listed above are provided as options to
the user when running reports, and the following warning appears:
Selecting I understand the risks, continue displays the report.
Selecting Cancel when using Quick Print stops the report from being run.
Selecting Cancel when running reports from the Reports menu, exports and scheduled jobs closes the warning message.
Selecting This is a computer I use frequently, remember my decision stores the decision as a cookie. If Cancel is selected, the report formats are no longer options when running reports. The user must delete the cookie to reverse this decision. If Continueis selected, the warning will not display when these report types are run.
- Disallow: The report formats listed above are not provided as options to the user when running reports.
Allow
Field Set Management Fields to exclude in field sets
This field helps you hide Person system table fields from users when they use field sets. See "Restrict Access to Person System Table Fields in Field Sets" for more information.
To hide a field, enter its OID path here. Use a comma to separate each OID path you enter.
Example: To prevent staff members from viewing each others' date of birth and gender, enter:
relStfPsnOid.psnDob,relStfPsnOid.psnGenderCodeBlank Enable record level security
Select this checkbox to allow for record-level security, a way to restrict a user role from using or viewing a specific record, based on a field associated with a reference table.
Deselected
Security question responses
Minimum length
Type the number of characters a user’s security question response must be.
4
Passwords
Days before expiration
Type the number of days before the system forces a user to change his or her password.
Note: If you type 0, users never have to change passwords. 90
Minimum length
Type the minimum number of characters a password must contain.
6
Require digits
Select this checkbox if you want user passwords to require at least one digit (0-9).
Selected
Require mixed case
Select this checkbox if you want user passwords to contain at least one lower-case and one upper-case letter.
Selected
Require non-alphanumeric
Select this checkbox if you want user passwords to contain at least one non-digit, non-letter character, such as a question mark (?).
Deselected
Validate with heuristics
Select this checkbox if you want to use heuristics to validate passwords. If you select this checkbox, a user’s password cannot do the following:·
- Match the user’s name (first, middle, or last), login ID, date of birth, or personal ID number.
- Be the word 'password'.
- Contain only a string of consecutive numbers (1234) or letters (ABCD), in ascending or descending order.
Selected
Unique password count
Type a number that indicates how many unique passwords a user must enter before he or she can reuse a former password.
For example, assume you type 3, and a user has the following password history (in chronological order):
- Apple
- Orange
- Banana
For the next password change, he or she could use Pear or re-use Apple, but could not use Orange or Banana.
If you type 0, the system does not track password history. However, a user must always pick a new value when changing his or her password.
3
Prevent changes
Select this checkbox to prevent users from changing their passwords.
Deselected
Allow browser auto-completion
When this checkbox is selected, Aspen will not try to prevent an internet browser from remembering user IDs and passwords. Aspen will not prevent the browser from auto-completing a user ID, potentially showing a user all Aspen user IDs recently entered through the browser.
If you deselect this checkbox, Aspen will attempt to prevent internet browsers from automatically completing user IDs and passwords, or displaying a list of previously entered user IDs, when users log in.
Important: Every browser behaves differently when remembering or completing form data, user IDs, and passwords; and several factors affect the way users log in to Aspen.
Even when this preference is deselected, some browsers might ignore it, based on the browser's settings. An operating system's settings could also affect the rendering, if the browser is closely tied to the operating system (for example, Internet Explorer® on Windows, Safari® on Macs). Check external settings when troubleshooting.Selected
Enforce strict policy
Select this checkbox to have Aspen enforce the Minimum length, Require digits, Require mixed case, Require non-alphanumeric, Validate with heuristics, and Unique password count preference settings, when a user’s password is edited in the
Deselected
Secondary Password
Enable secondary password
Select this checkbox to use secondary passwords in your
Important: Enabling secondary passwords can have some unintended consequences. Before you enable this preference, remember the following:
-
You, as the Aspen system administrator, must create a secondary password before logging out (Set Preferences > Security). If you do not, you will lock yourself, and everyone in your district, out of Aspen.
-
To create a secondary password for yourself and others, you must select Enable secondary password changes. If you do not, the option to create a secondary password does not appear in the Security tab of your user preferences.
-
You must assign a secondary password to every user in your district for them to access their account. They can reset it after first login.
Deselected
Enable secondary password changes
Select this checkbox to allow users to change their secondary password from Set Preferences > Security.
Deselected
Trusted networks
Type a list of IP locations that are allowed for users to log on without entering a secondary password. Separate each IP location with a comma.
If an IP location is not on the list, users must enter their secondary password.
If you leave this field blank, Aspen assumes all IP locations use the "Outside trusted networks" preference.
Blank
Days before expiration
Type the number of days after the secondary password is set that it will expire.
90
Minimum length
Type the minimum length of a secondary password.
6
Require digits
Select this checkbox if the secondary password must include numbers, in addition to letters.
Yes
Require mixed case
Select this checkbox if the secondary password must include mixed case (upper and lower case) letters.
Yes
Require non-alphanumeric
Select this checkbox if the secondary password must include special characters (@ # & *) and/or punctuation marks (! , . ), in addition to letters and/or numbers.
No
Validate with heuristics
Select this checkbox if you want to use heuristics to validate secondary password. If you select this checkbox, a user’s password cannot do the following:
- Match the user’s name (first, middle or last), login ID, date of birth, or personal ID number.
- Be the word 'password'.
- Contain only a string of consecutive numbers (1234) or letters (ABCD), in ascending or descending order.
Yes
Unique password count
Type the consecutive number of passwords that must be unique. For example, if you type 3, three passwords in a row much be unique and not repeated.
3
-
Note: After a user’s password expires, Aspen outlines the password requirements to help the user come up with a new password.
- Click Save.