My Resources is each user's personal document repository within Aspen. It is accessible from the Group Resources widget.
For example, teachers can store items such as course materials, classroom policy documents, links to web sites of interest, and PowerPoint presentations. Students can store homework assignments, science fair projects, recommendation letters, and more.
No one can ever access another user's My Resources.
For teachers and page administrators, My Resources can serve as a central storage area for materials that need to be shared with many groups. Any files uploaded to My Resources can be copied to a Page's Group Resources widget by dragging and dropping.
Members of a Page can see and download the resources but cannot edit or delete them. All files uploaded are owned by the uploader.
Also, teachers can easily attach a resource stored in My Resources to a homework assignment. Use the Resources Provided by the Teacher section of the new assignment page.
| Note: There are
storage space quotas for different types of users. These can be adjusted
in the |
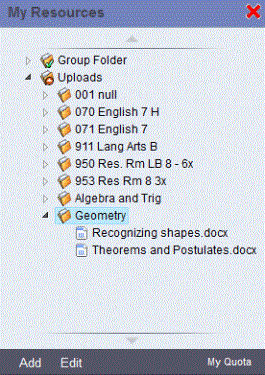
There are four different folder icons used in My Resources:
-
 : User-created folder.
 -
 : Group folder (only page administrators can upload files into and delete from this type of folder).
 -
 : Group folder with read-only access (group members can only view files in a group folder).
 -
 : Uploads folder, automatically created when a teacher uploads a file or weblink directly into an assignment (rather than dragging from My Resources). A subfolder for the class appears, with the file/weblink within.
Notes:
- You can move, rename, and delete user-created folders and files.
- Teachers can rename their Uploads folder, such as to Amy's Uploads. For each class that you upload files to, Aspen will create another subfolder within your Uploads folder .
- You cannot have two files with the same name within Group Resources or My Resources (unless they are in different folders). If you upload or copy a file to a folder already containing a file of the same name, Aspen automatically appends a number, starting with (2), to the name of the file that's been added or moved.
- You can use a different set of Group Resources for each tab. If you add a resource to a folder that has the same name as a Page tab, that resource will automatically appear in the Group Resources widget for that tab.
You can do the following:
- Add different types of files to My Resources.
- Edit, delete, and copy files that have been added to My Resources.
- Drag and drop individual files or folders from My Resources to Group Resources (and vise versa).
- Manage your storage quota.
- Do one of the following:
- If you are a teacher, do one of the following in the Staff view:
- Go to the Planner tab. Select the Events view, and then click My Resources.
- Click the
Note: You can also access My Resources from an assignment's details page (
- For any other users, go to the Group Resources widget. Click Edit in the title bar. At the top of the widget, click My Resources.
-

My Resources appears.
Note: You only have one My Resources storage area. No matter what Page you are on in Aspen, your My Resources pop-up contains the same files.
- At the bottom of the widget, click Add. The menu expands.
Note: Teachers with Aspen IMS who access My Resources from the Staff view's Planner can add online quizzes.
- Select one of the following:
-
Field Description File
Click Browse to locate the file, and add a Description.
Note: Files can include Word documents, Excel spreadsheets, images, and PowerPoint presentations. Google Doc Type a Description. Then click Select Google Document to select from the available files. Click Select Document.
Note
Type a Title and the Text of your note (such as comments about a particular lesson plan).
Online Quiz Create an online quiz using questions from the question bank or that you create. Weblink
Type a Name, Description, and URL (you can copy and paste into this field).
Folder
A new folder appears. If desired, you can rename the folder, move it, and drag and drop files into it.
Multiple Files Note: If you have a specific place where you want a file or folder to appear, select that location in My Resources before you add the files. When you click Multiple Files, the resulting messages/pop-ups that appear are based on your operating system and browser. In general, you want to keep, enable, and allow the Java Web Start application on your computer. If a security pop-up appears, click Run.
The application automatically starts to run, and an Aspen File Uploader pop-up appears.
Click Add files to select multiple files, one or more folders, or a combination of files and folders. (Press and hold the Shift key to select multiple files or folders adjacent to each other; press and hold the Ctrl key to select multiple files or folders not adjacent to each other).
Note: Once you make a selection, it is possible to continue adding files until you reach your quota. Click Upload. A confirmation message appears. Click OK. The selected files or folders appear in My Resources.
Note: If you saved the Aspen Uploader file to your computer, the next time you click Multiple Files, find and
select the icon in your taskbar to view the Aspen File Uploader pop-up.
Note: Files uploaded to My Resources cannot be edited in My Resources. To edit a file stored in My Resources, download it to your computer, edit the file, and upload it again.
To edit, delete, and copy files in My Resources:
- Select the file or folder that you want to edit.
- At the bottom of the My Resources pop-up, click Edit. The menu expands as follows.
-
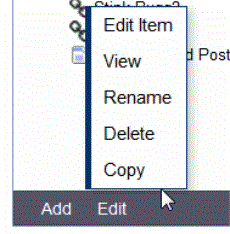
- Select one of the following:
-
Field Description Edit Item
A details pop-up appears, where you can edit details such as file name, description, and file location.
You cannot edit the contents of a file. To do that, you need to do one of the following:
- Download the item, edit it, and upload the edited version.
- Edit the version that's on your computer, upload it, and delete the unedited version.
Note: You cannot edit a folder. View
Based on your selection, one of the following occurs:
- For a folder: The folder expands (if it was already expanded, nothing happens).
- For a file: The file opens directly, or a pop-up asks you whether you want to save or open the file.
- For a note: The note details appear, where you can make edits.
- For a Google Doc: You need to have a Google account and might need to grant Aspen access to Google Docs.
- For an online quiz: The quiz appears. You can see and take it just as a student would in the Student portal.
- For a video: The video opens in a new window.
- For a web page: The web page opens in a new window.
Note: Clicking Edit and then View is the same as double-clicking the item. Rename
A rectangle appears around the folder name, and the text is highlighted. Type the new name and then press Enter on your keyboard.
Note: You cannot rename a file. Delete A confirmation message appears. Click OK.
Notes:
- If you are running out of space and want to delete multiple files at once, click the My Quota link on the Group Resources widget.
- If you delete a file from My Resources that has been attached to an assignment, students will no longer have access to that assignment.
Copy
A copy of the file appears, with a number, starting with (2), appended to the file name.
Note: You cannot copy a folder.
To copy a file or folder of files between Group Resources and My Resources:
Besides working with individual documents, it is possible to copy a folder or multiple levels of folders from Group Resources to My Resources, and from My Resources to Group Resources.
|
Notes:
|
- In the title bar of the Group Resources widget, click Edit. The My Resources button appears.
- Click My Resources. The My Resources pop-up appears (which you can click and drag to the desired location).
-
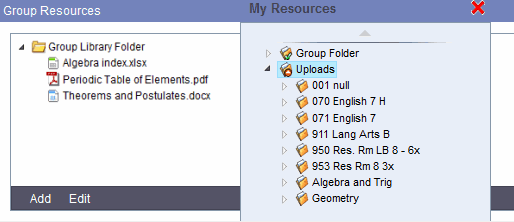
- Click your mouse button to select the file or folder in Group Resources or My Resources that you want to copy.
- While still holding your mouse button down, drag the item to the location in Group Resources
or My Resources where you want it to appear.
Note: If you are copying an individual file, drag it onto the folder you want it to appear in. You can copy multiple files by clicking and holding the Shift key before you select the files.
- Release your mouse. The files or folders are copied.
-
Additional notes:
- When you drag and drop folders between Group Resources and My Resources, the folders are actually being copied, not moved. They exist in both places.
- If you have reached your space quota, the folders or files will not copy, and an error message appears.
- Online quizzes in My Resources cannot be copied to the Group Resources widget.
Manage your storage quota
Every Aspen user has a storage quota for the files they can upload to My Resources and Group Resources. In the Group Resources widget and My Resources, the My Quota indicator  at the bottom of the box displays how much storage space you have left (in MB - megabytes).
- Click My Quota. The My Quota pick list displays all of the individual files that make up your current quota.
-
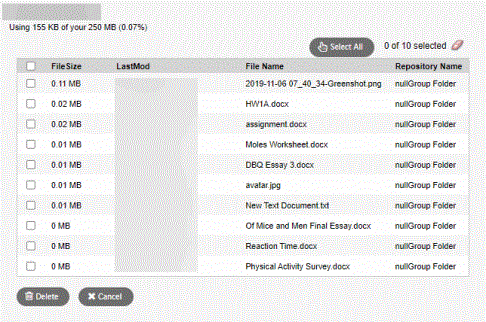
- From here, you can do any of the following:
- View the details of the files that you have uploaded, including size and date last modified.
- To navigate through the Pages of files, click the Page drop-down or use the arrow keys.
- To delete a file or files, select the appropriate checkbox(es) and click Delete. A message asks you to confirm the deletion. Click Yes to confirm. The files are deleted, and your space quota is updated accordingly.