Using Snapshots to Create and Store Groups
A snapshot represents a static filter. Think of a snapshot as a picture of a particular group of students, staff members, courses, or rooms that you can file and easily retrieve.
Create a snapshot to group records that don't have a field in common that can be queried (such as a group of students you want to monitor) or to create a list that's associated with a specific time (Q1 Honor Roll).
For example, assume you manage the Math club and want to be able to quickly access all of the students who are members. You can use a query to find the students initially, and then create a snapshot of these students. This way, each time you want to work with students in the Math club, you need only refer to your snapshot.
You can also manage snapshots for individual records.
To create a snapshot:
- Do one of the following:
- To create student snapshots, log on to any view and click the Student tab.
- To create staff snapshots,
log on to the
- To create special education snapshots, log on to the Special Education view and click the IEP tab.
- To create course snapshots, log on to the Build view, and click the Courses tab.
- To create room snapshots, log on to the Build view, and click the Rooms tab.
- Search for or select
the records you want to include in your snapshot. You might select
these records individually, or use a query
to find them.
Note: Be sure to select the checkbox next to each record you want to include in your snapshot, click the Options menu, then click Show Selected.
- Select Options > Snapshots.
- In the Manage Snapshots pop-up, click New. The Snapshot Definition pop-up appears.
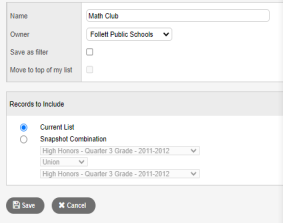
- Type a name for this snapshot.
- Click the Owner drop-down to select the user,
school
Note: Not all users have privileges for all levels of ownership.
- If you would like
to make this snapshot an option on your Filter
menu
 , select the Save as filter checkbox.
 - If you would like this snapshot to be your default filter (for example, whenever you open the Student List, these are the records you'd like to see), select the Move to top of my list checkbox.
- In the Records to Include box, select one of the following:
- Current List to include only those records you selected checkboxes for on the list page.
- Snapshot Combination
to combine two existing snapshots. (This option is only available
if you have already defined at least two snapshots.)
- If you selected Snapshot Combination, use the following table to determine how you want to assemble the two snapshots you select:
-
Select
To include the following in the snapshot:
Union
Any records that appear in the first snapshot you select or the second snapshot you select. For example, if you want to create a snapshot of students who appear on either or both the first term and second term honor roll, select Union.
Intersect
Only records that appear in both the first and second snapshot you select. For example, if you want to create a snapshot of students who appear on both the first and second term honor rolls, select Intersect.
Difference
Any record that appears in the first snapshot you select, but not in the second. For example, if you want to create a snapshot of students who appear on the first term honor roll, but not on the second term honor roll, select Difference.
- Click Save. The Manage Snapshots pop-up displays the snapshot you created.
- Select the snapshot
you created, and click Use.
The list page displays the records
in the snapshot selected.
Note: You can also save a snapshot to the Filter menu on a list page. Then, you can quickly select that snapshot.