Before you can rotate the master schedule you built, you must first create the rotation map, and assign each section on the workspace a rotation ID.
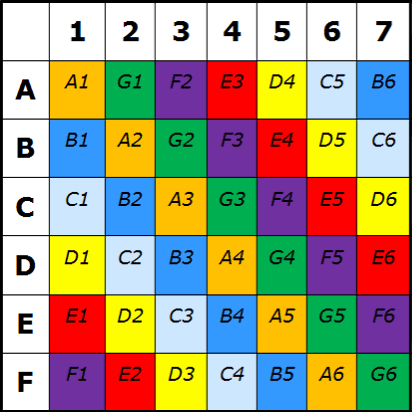
For example, assume a school wants to rotate the schedule from a 6-day x 7-period matrix to a 7-day x 6-period matrix, as shown below. One period is dropped each day from the unrotated schedule to get the rotated schedule.
In the rotated schedule, each class only meets 6 times in the 7-day cycle, but each meeting time is longer than in the unrotated schedule. Therefore, the overall class time each week does not change:
Flat Schedule (7 x 6)

Rotated Schedule (6 x 7)
To create a rotation map:
- Log on to the Build view.
- Click the Scenario tab.
- Select the scenario you want to rotate, and click the Rotations side-tab.
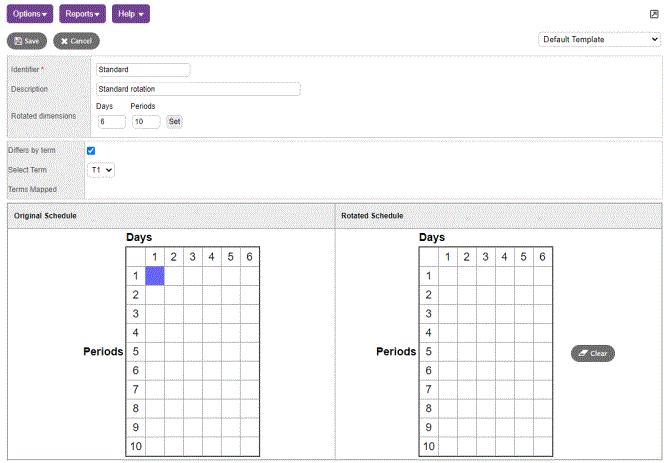
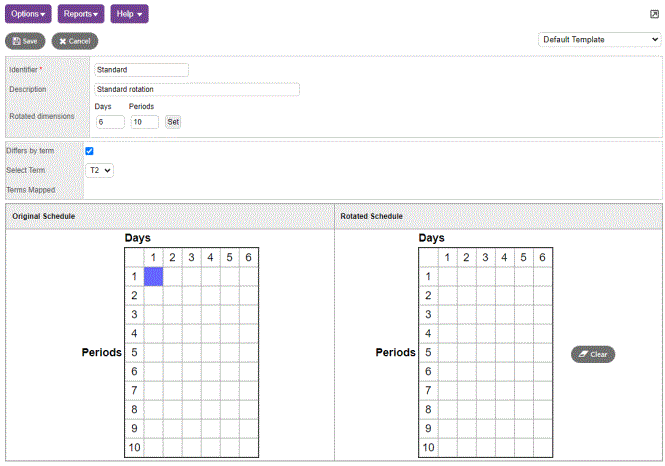
- On the Options menu, click Add. The New Schedule Rotation page appears.
- Type the rotation ID and a description.
- Type the rotated dimensions. This creates the proper size matrix for you to identify the rotation map.
- Select the Differs by term checkbox if you want to define a different rotation for each schedule term. If you select the checkbox, the Select Term drop-down appears. Select the first term you want to define a map for.
- On the original schedule matrix on the left-hand side of the page, select a period and day. Then, on the rotated schedule matrix on the right-hand side of the page, select the periods and days in which you want that period to meet. Repeat this process for all periods and days.
-
If you select the Differs by term checkbox, define the rotation map for each non-overlapping term that spans the entire school year.o define rotations that differ by term, select a term at the Select Term field each time you finish a map for a term.
Note: Switching back and forth between terms does not delete the rotations you are creating; you cannot save the rotation until all rotations have been identified for all terms in the Select Terms drop-down.
Term 1:
Term 2:
- Click Save.
A single schedule can have multiple rotations. You create each rotation as above if you have more than one.
Once you define the rotations, you must assign each section on the workspace a rotation ID before you can actually rotate the schedule.