Record health visits by day
You can use the Daily Log page to record student, staff, and
student contact![]() an adult you can contact regarding a student's academic or personal information health visits for a specific
date. The Responsible Staff Name defaults to the person who logged on
to the Health view.
an adult you can contact regarding a student's academic or personal information health visits for a specific
date. The Responsible Staff Name defaults to the person who logged on
to the Health view.
To enter all health visits by day:
- Log on to the Health view.
- Click the Visit tab. The Daily Log page appears.
-
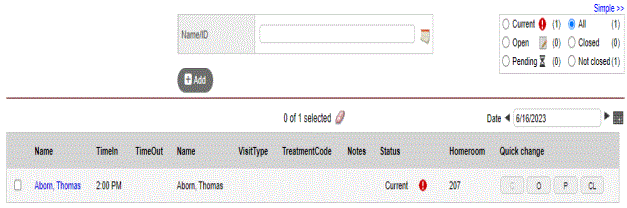
Note: The Daily Log defaults to the current date. A list of any visits you have already entered appear in the table.
- To change the date, do one of the following:
- In the Date box, type a new date, and then press Enter.
- Click the Calendar icon
 to select the date.
 - Click the arrows to navigate to a different date.
- In the Name/ID field, type the last name of the person you need to enter a health visit for. Do one of the following:
- For students:
- Type a full or partial name, and then click Add. By default, a list of student names appear, starting with the closest match. Or, type a student's identification number, such as
- Type a full or partial name, and then click Add. By default, a list of student names appear, starting with the closest match. Or, type a student's identification number, such as
- For staff:
- To view a list of staff members, type a name, and then select Staff.
- For contacts:
- To view a list of contacts, type a name, and then select Contact.
- If there is an exact match, the name auto-fills in the field, or a list of options appear.
-

- Next to the Name/ID
field, click the Visit calendar
icon
 to select any medication
administration appointments scheduled for today.
to select any medication
administration appointments scheduled for today.
- Click an individual's name, and then click Add.
- To view or enter detailed information for an existing visit, click a student's name in the Name column. The New Health Log page appears.
-

- At the top of the page, next to the student’s name, any alerts associated with the student appear. Click an alert to view health information for the student without leaving the health log entry page:
- Click the Medical
alert
 to view a medical alert for
the student, such as a severe allergy.
to view a medical alert for
the student, such as a severe allergy. - Click the Medications
alert
 to view a list of medications the student takes.
 - Click the Conditions
alert
 to view any pre-existing conditions.
 - Click the Low
medication balance alert
 to view any medication orders that have reached their low balance
threshold.
to view any medication orders that have reached their low balance
threshold.
- Enter information regarding the visit in the fields.
-
Notes:
- You can select or type one primary complaint, treatment, and action only. To add secondary complaints, treatments, and actions, click Add. You can select more than one.
- The right side of the page displays fields associated with the complaint you enter. Select a template from the drop-down in the top-right corner. Your Aspen system administrator creates complaint-specific templates.
- Depending on the amount of information you enter for the visit, you can change the status at the Status field by selecting one of the following:
- Closed: You can change the status to Closed after you enter all the required information.
- Current: This is the initial status of all visit logs. To quickly create an entry record, type the student’s name, current date, and time in. Click Save at the bottom of the page so you can complete the rest of the visit details later.
- Open: Change the status to Open after you enter a referred staff name, responsible staff name, and primary complaint.
- Pending: Use the Pending status to mark visits you need to continue to work on. For example, you might mark a visit pending while you wait for a student’s parent to return your call.

- If this visit is to administer medication, use the Medication Administration area at the bottom of the page:
-

- Do the following to administer medications to this student during this visit:
- If the student has any medications scheduled for today, they appear in the Scheduled medication list. If a medication time is past or next due, the Administered checkbox is selected. To administer another scheduled medication during this visit, select the Administered checkbox.
- The default dose amount appears. You can edit this amount.
-
- Click Save. The entry appears on the daily log.
|
Note: Until you select Closed at the Status field for this visit, you can deselect the Administered checkbox, and click Save to undo or cancel the administration of that medication. Aspen updates the inventory for each rx order and standing order. |