Generate a Quick Report using the Reports menu
Use a Quick Report to create an on-the-fly report of the information you are viewing on a list page. You decide what's on it, and the system formats it to look professional.
If there is a particular report that you run every week, such as an attendance report, creating and saving a Quick Report means that you only have to set up the formatting once. Then, every time you run the report it will look the way you want it to.
For example, maybe you like to shade every other line for easier reading and set up the report to pull statistics such as boy totals and girl totals per attendance category. If you save your Quick Report and run it each week, the formatting will look the same, but the information on the report will vary based on the data in the system.
Other users in your school and
Before starting to create your Quick Report, get your list page (such as the Student List) showing the fields and records that you want to include. This minimizes the setup time in the Quick Report wizard.
|
Important: Quick
Reports include any records that appear on the current list |
The Quick Report wizard contains eight steps, but only the first four are required. The others let you customize the report's format and design. If you prefer, you can do the formatting in Excel.
|
Note: You can also
create a Quick
Report from the Quick Print menu.
If you just want to print the information on your screen, click the Quick Print icon |
To generate a Quick Report from the Reports menu:
On the Reports menu, click Quick Report. The Quick Report wizard appears.
The Quick Report wizard has eight steps:
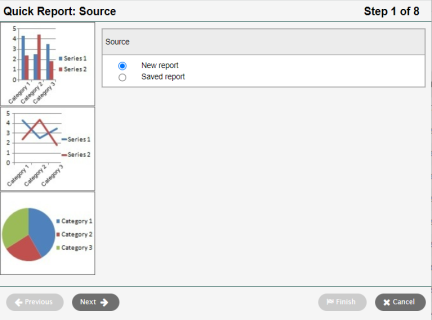
Step 1: Source
- Do one of the following to determine if you want to create a new Quick Report or use one that's been saved:
- Click Next.
Step 2: Report Type
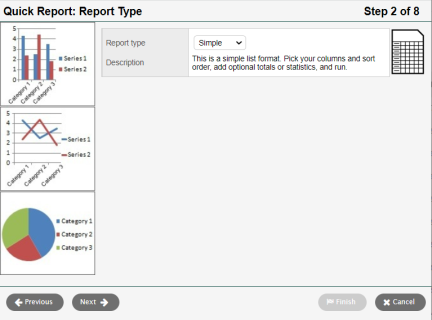
- Click the Report type drop-down to select the type of report you want to run.
-
Type
Description
Simple

The Simple Quick Report produces a list of the records and fields you select to include. You select the columns and sort order
 determines the order that records appear in on any list page.
You can also add totals or statistics, which appear in a summary
table below the list of records.
determines the order that records appear in on any list page.
You can also add totals or statistics, which appear in a summary
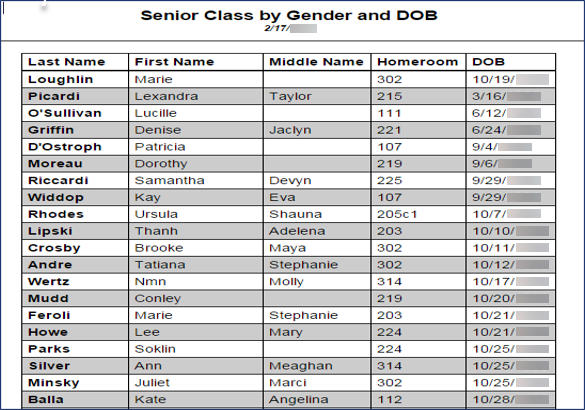
table below the list of records.Example: Your Senior Class Advisers have asked for a list of all students in the senior class sorted by gender and then by date of birth. Include their first, middle, and last name, as well as their homeroom and date of birth. See how it looks. Detail

The Detail Quick Report produces a page for each record, and the report aligns the data fields vertically instead of horizontally.
For example, when running a Detail Quick Report on a student-based list, each student record appears on a separate page, with the fields you select as the rows.
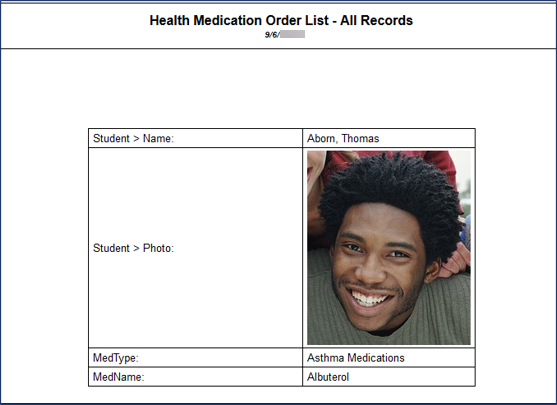
Example: Your School Nurse has asked for a detailed report for each student that has a standing visit to the nurse’s office regarding a medication they need to take. This includes a photo of the student so the nurse can recognize them when they first enter the office (would also benefit the substitute nurse that may be in the office when the regular nurse is out). See how it looks. Group

The Group Quick Report groups records by the fields you select. For example, on a Student List you can group records by homeroom.
After you select Group, Step 3 displays the fields available to group records by. Then, on Step 5, you can include page breaks as well as calculate totals by group. For example, use Group Quick Reports to print homeroom or bus lists.
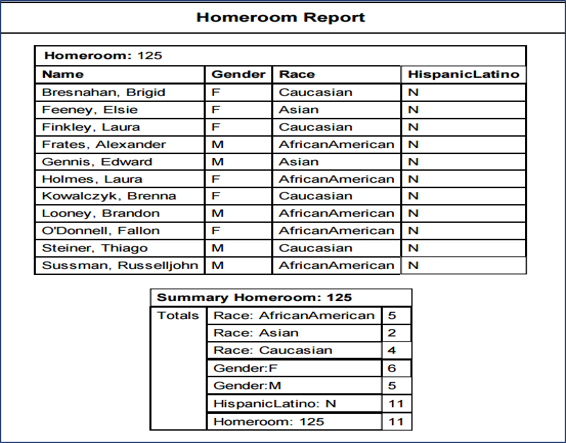
Example 1: You want a report for all your homerooms that lists all the students in each homeroom (with each homeroom and statistics on its own page).
The report should show the total number of males and females, along with the total number of students in each homeroom. Included should also be a count by race for each homeroom, along with a count of the number of Hispanic or Latino students.
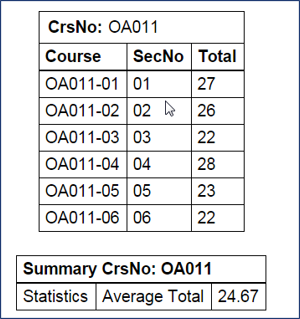
Example 2: You want to know how many sections of each course exist in the master schedule, as well as the total number of students enrolled and the average number of students per section. See how it looks.
Summary

The Summary Quick Report hides individual records from the list and produces a list of cumulative values based on the records.
Use this report to print totals and other statistical reports.
After you select Summary, Step 3 displays the fields available to produce values for. Then, on Step 5, you can include page breaks, as well as calculate totals.
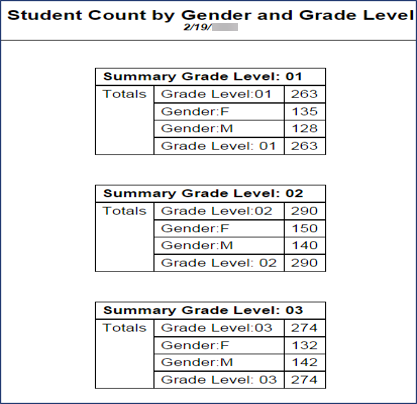
Example: The district needs to know how many students are in each grade level by gender. See how it looks. Notes:
- The Group and Summary Quick Reports are the same, except the Group report shows individual records and totals and the Summary report only shows totals.
- When you select a report type, a description of the report type and a visual representation of it appears to the right.
Note: If you selected the Group or Summary report type, you need to make your group type selection. See Step 3: Field Selection for instructions.
- Click Next.
Step 3: Field Selection
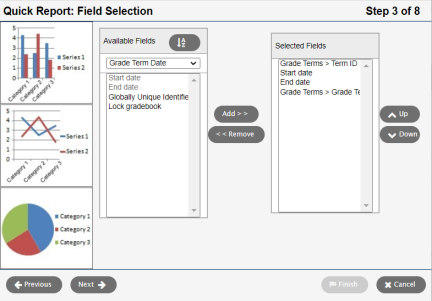
- Select the fields
you want to include on the report and the order you want them to appear
in.
Note: Fields are organized by table. When the Student table is selected, fields in that table, such as Name and Grade level, appear below. If you do not see the field you are looking for, click the drop-down arrow to select a different table.
- Highlight a field
in the Available
Fields column, then click Add
to add the field to the Selected
Fields column. To select several fields next to each other,
press SHIFT and the Up or Down
arrow on your keyboard to select the fields. To select several fields
together that do not appear next to each other, press CTRL
while you click each field you want to include.
Notes:
- Fields in the Available Fields
column for each table are listed from most commonly used to least
commonly used. To display the fields in alphabetical order, click
the Alpha Sort button
 .
. - Sort the fields in the Selected Fields column to appear in the order you want them on the report. The first field in the Selected Fields column is the first field to appear for each record on the report. Highlight a field, and click Up or Down to move it.
- If you are creating a new Quick Report, the Selected Fields column displays all fields in the current field set by default. If you are running a saved Quick Report, the Selected Fields column displays the fields previously selected for this report.
- Fields in the Available Fields
column for each table are listed from most commonly used to least
commonly used. To display the fields in alphabetical order, click
the Alpha Sort button
- To remove a field from the Selected Fields column, highlight it, and click Remove.
- Click Next.
Step 4: Sort Order
| Note: Steps 4-8 are optional for formatting. If you are not concerned about your report's appearance, you can click Finish now. |
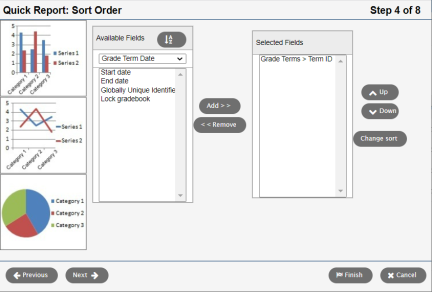
- To determine how the system sorts the overall report, such as which records print first, do the following:
- In the Available Fields column, highlight the
field you want the system to use to sort the report by, and click
Add to move the field to the
Selected Fields
column. You can continue to select fields and add them below the primary
sort.
Note: Fields in the Available Fields column for each table are listed from most commonly to least commonly used. To display the fields in alphabetical order, click the Alpha Sort button
 .
.
- In the Selected Fields column, highlight the fields and click Up and Down to determine the sort order (the field that appears first in the column is the primary sort, then the secondary sort, and so on).
- Click Next to continue with setting up grouping and formatting options (optional). Or, click Finish to run your report.
Step 5: Totals and Statistics
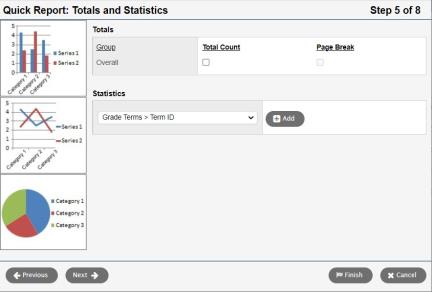
- In the Totals
section, to include totals of records on the report, select the Total Count checkbox next to the
Group.
Note: If you select the Group report type in Step 2, the report can also include totals by any of the groups you defined in that step. Then, select the Page Break checkbox if you want the report to start on a new page after each group and its totals appear.
- In the Statistics section, for each field you include on the report, the report can provide the minimum, maximum, and total count of each field. For example, click the drop-down to select Gender, click Add, and select COUNT to see totals of boys and girls. You can also track field averages and sums for numeric fields. Following any statistic selection, if you have selected group by fields, specify exactly when you want that statistic to reset. By default, the statistic will be reset only at the end of the report. If a group field is chosen, the value will be reset at the end of that grouping, allowing you to view group-based statistics.
-
You can add several statistics and resets for each field.
- Click Next.
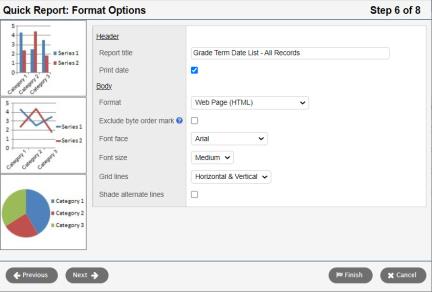
Step 6: Format Options
-
-
Field
Description
Header Report title
Type a title for the report.
Print date
Select this checkbox if you want the report to print the current date.
Body Format
Select one of the following:
- Web Page (HTML) to view the information in an HTML file.
- Comma-separated values (CSV) to print the information in a text file that separates each field with a comma. The file will be saved with a .CSV extension.
- Comma-separated values (TXT) to print the information in a text file that separates each field with a comma. The file will be saved with a .TXT extension.
Note: The two comma-separated values formats (CSV and TXT) create identical files; the only difference is the file extension. Some Web browsers only handle one extension properly. Use the extension that works for your browser. Exclude byte order mark
Select this checkbox if the report is used in an application that has problems loading the file or rendering special characters. If this checkbox is not selected, the Unicode byte order marks are added to the beginning of the report. Note: Some of the following options are only available for specific formats. Font face
Select the font you want the report to print in.
Font size
Select the font size of the report.
Grid lines
Select the type of grid lines (vertical, horizontal, or both), if any.
Shade alternate lines
Select this checkbox if you want the report to shade every other line for easier viewing.
- Click Next.
Step 7: Field Format Options
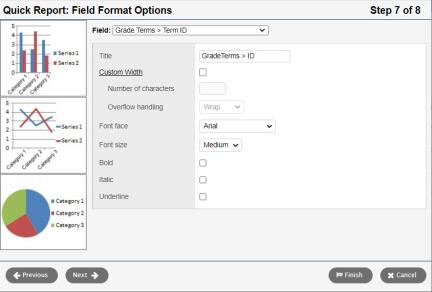
- For each field that
displays on the report (the columns of information that appear), you
can define a custom width in number of characters, and specific font
and text effects.
Note: If you include a field that contains a large amount of text, you can define the number of characters to display. Then, you can select a value at the Overflow handling field. For example, if you select Wrap, any text after the custom width appears on the next line of the report.
- Click Next.
Step 8: Save Options
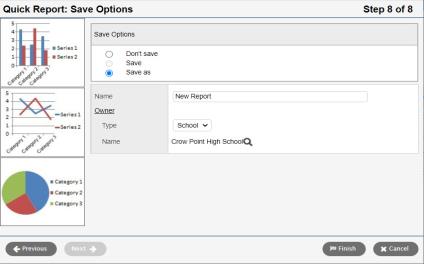
-
-
Field
Description
Save Options
Select one of the following in the Save Options box:
- Select Don’t save if you do not want to save the report parameters you just selected. When you click Finish, if you like the report that appears, you will have to go through the wizard again to recreate it.
- Select Save to save any changes you made to an existing saved report.
- Select Save as to save the parameters you entered as a new Quick Report.
Name
If you selected Save as, type a name for the report (this is the report's file name, not its title).
Owner Type
Select the type of report (User, School, Intermediate Organization, or District). The options available to you depend on the view you are logged into and your privileges.
Name
Click
 to change the name of the report's owner.
- Click Finish. The report displays the information in the format you selected.