Generate a Quick Print using the Printer icon
You can generate a Quick Print using the Quick
Print icon ![]() in the menu bar on any list page.
This is the highest level of reporting in Aspen: Filter to the records you want, select the data you want (field set), sort the data in the order you want, and then export the data using Quick Print.
in the menu bar on any list page.
This is the highest level of reporting in Aspen: Filter to the records you want, select the data you want (field set), sort the data in the order you want, and then export the data using Quick Print.
Clicking the Quick Print icon once is the same as going to the Reports menu, clicking Quick Report, and selecting the Simple report type.
Or, to create a different type of Quick Report, click the Quick Print icon and then select Create Quick Report to go directly to the Quick Report wizard.
To generate a Quick Print using the Quick Print icon:
- Go to the list page containing the type of data you want to report on.
- Select the records you want to include on the report.
- On the Options menu, click Show Selected.
-
Important: Quick Prints include any records that appear on the current list
 (in this example, 553). Use a filter
 a set of criteria to selectively screen out incoming information, such as "all active students" or "former students",
query a request to find a group of records that match specific criteria at a particular time, snapshot a static picture of a particular group of records that you can file and easily retrieve,
or custom selection to limit the number of records to include in your
Quick Print.
a set of criteria to selectively screen out incoming information, such as "all active students" or "former students",
query a request to find a group of records that match specific criteria at a particular time, snapshot a static picture of a particular group of records that you can file and easily retrieve,
or custom selection to limit the number of records to include in your
Quick Print.
- Click the Quick Print icon
 in the menu bar. The menu expands.
 -
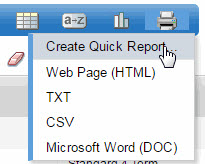
- Click one of the
- Web Page (HTML): To view the information in an HTML file.
- TXT: To view the information in a text file that separates each field with a comma. If saved, the file will have a .TXT extension.
- CSV:
To view the information in a text file that separates each field with
a comma. If saved, the file will have a .CSV extension.
Note: The two comma-separated values formats (TXT and CSV) create identical files; the only difference is the file extension. Some Web browsers only handle one extension properly.
- Microsoft Word (DOC): To view the information in a Word document. The data appears in a table, which has all the available options for borders and shading.
- To print the report, do one of the following:
- From your browser window or pop-up, go to File > Print.
- From Microsoft Word,
click the Office Button
 and then click Print.
To generate a detail, summary, or group Quick Report using the Quick Print icon:
- Go to the list page containing the type of data you want to report on.
- Select the records you want to include on the report.
- On the Options menu, click Show Selected.
- Click the Quick Print icon
 in the menu bar. The menu expands.
 -
- Click Create Quick Report to open the Quick Report wizard.
See Generate a Quick Report from the Reports Menu for complete instructions on running a Quick Report.