Configure the Destiny Synchronization report
- Log on to the
- Click the Tools tab.
- Click the Jobs side-tab.
- On the Options menu, click Add. The New Job Entry page appears:
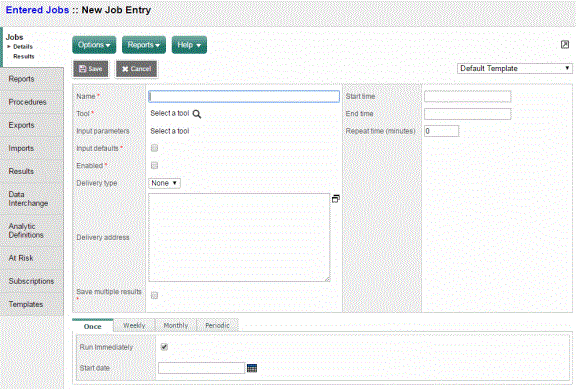
- Complete the fields according to the following table:
-
Field
Description
Name
Type a name for the job.
Tool
Click
 to select
the type of tool, and select Import/Export. The Tool Selection
pop-up appears:
to select
the type of tool, and select Import/Export. The Tool Selection
pop-up appears: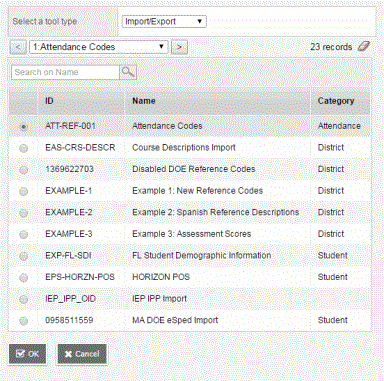
Select Destiny Synchronization Export and click OK. The Input Parameters field appears on the New Job Entry page.
Input Parameters
Click Set. The pop-up that appears is specific to the tool you selected. For example, if you selected Attendance Bulletin, the report parameters specific to the Attendance Bulletin appear. Select the tool input parameters, and click Save.
Note: This field is required. You must click Set and then Save, even if no parameters are needed. Input Defaults
Select this checkbox to use the system’s default input parameters. For example, if a report defaults to today’s date and is run daily, you might select this checkbox.
Enabled
Select this checkbox to enable the schedule you define for this job. The job will run automatically for the schedule you set. If Enabled is not selected, the job will not run automatically, but it still can be run manually.
Note: If you define a schedule for this job and do not select the Enabled checkbox, the system does NOT run the job at the scheduled times and days. Delivery Type
Select one of the following to determine if you want the job results sent, and if so, how they will be delivered:
- None: The results are available only by clicking Results on the Jobs side-tab.
- Email: The results are
emailed to the address(es) you enter in the Delivery
address field.
Note: If the job results do not get emailed to you, check the
- File: The results are saved to a file on the server, as determined by the path you type in the Delivery address field.
Delivery Address
Do one of the following to indicate where the results will be sent:
- If you selected Email at the Delivery Type field: Type the email address(es). Separate multiple email addresses with a comma.
- If you selected File at the Delivery Type field: Type the path and file name.
Save Multiple Results
Select this checkbox to save the results of every run of the job. Otherwise, the system only saves the results from the last run of the job.
Note: If you select the Save Multiple Results checkbox, be sure to manage the results on the Results page for each job. Entries on the Results page can accumulate over time, consuming disk resources on the server. Start Time
Type the first or only time you want the job to begin on any day you define the job to run. Certain jobs, like Analytic Definitions, are resource intensive and should be scheduled for off-peak hours. It is also a good practice, because they access a large amount of data, to stagger the start times of Analytic Definition jobs.
End Time
If the next Repeat Time field is defined, type the latest time you want the job to run on any day you define the job to run. You need to define an End Time only if you define a value in the Repeat Time field.
Repeat Time (minutes)
Type the number of minutes between runs if you want the job to repeat.