Add a goal to your user goal bank
The user
goal bank![]() a collection of goal text with objectives that you use often contains goals that are
only available to the user who writes them and are owned by the user.
They save you time when you are frequently writing the same or similar
goals for students while you work on your IEPs. You can save the goals
you use often, along with any attached objectives, to quickly select and
edit for your students.
a collection of goal text with objectives that you use often contains goals that are
only available to the user who writes them and are owned by the user.
They save you time when you are frequently writing the same or similar
goals for students while you work on your IEPs. You can save the goals
you use often, along with any attached objectives, to quickly select and
edit for your students.
To add a goal to your user goal bank:
- Log on to the Special Education view.
- Click the IEP
 Individualized Education Program
tab.
Individualized Education Program
tab. - Find and select the IEP.
- Click the Goals side-tab.
- Select the goal.
-
Note: If your
- Click the yellow Unlocked icon
 .
. - When the green Locked icon appears
 , you can edit the IEP.
 -
If the red Locked by another user icon
 appears, someone else has locked the IEP data for editing, and you must wait until they are done before you can make your changes. If you have override privileges, you can override the lock. If you do so, the following warning appears.
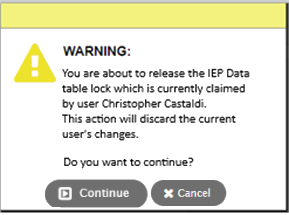
- When your changes are complete, click Save, and then click to release the lock.
-
If a lock is overriden by someone else, the following prompt appears when you attempt to save.
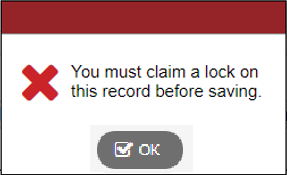
Click the yellow Unlocked icon
to reclaim the lock, re-enter your edits and save your changes; then click to release the lock. - Click the yellow Unlocked icon
- After you write
a goal and create objectives for a specific student on the IEP
tab, click Add to Goal Bank.
Step 1 of the Add to Goal Bank wizard a sequence of dialog boxes which walk a user through a potentially complex task, such as the Build Study Locations wizard
appears.
- Determine if you want to create a new goal or update an existing one from your bank. Click Next. Step 2 of the 'Add to Goal Bank' wizard appears.
- Select the Category and Subcategory.
- At the Owner
field, select your user name.
Note: A list of people who were invited to the meeting appears. Click the appropriate checkbox to complete the following actions.
- In the Student names field, the system enters the name of the student you are currently writing a goal for. Aspen uses this information to determine where in the goal text it must replace information with information from the current student. For example, assume you add a goal to your bank for a student named Chris. When you use this goal for another student, the system replaces every instance of Chris in the text with the current student's name. The system also updates any pronouns appropriately (he/she, his/her, etc.)
- Click Next. Step 3 of the 'Add to Goal Bank' wizard appears.
- Type the goal text, and click Next. Step 4 of the 'Add to Goal Bank' wizard appears.
- Click Add to associate objectives with the goal. Before you click Finish, be sure you select the checkbox next to any objectives you want to save with this goal.
- Click Finish. This goal is now available for you to select and easily edit while writing goals for other special education students.