Setting up the summer school in the School view
When setting up the School view for the virtual summer school you created, complete the following steps each year:
- Create and set the summer school schedule as the active schedule.
- Add courses to the summer school catalog.
- Create the structure of the summer school schedule.
- Create the master schedule for summer school.
- Populate rosters for sections.
- Prepare
Create and set the summer school schedule as the active schedule
You must create and set the summer school schedule as the active schedule in your virtual summer school.
To create and set the summer school schedule as the active schedule:
- Log on to the School view for the virtual summer school you created.
- Click the School tab.
- Click the Schedules side-tab.
- On the
Options menu, click Add. The New Schedule page appears:
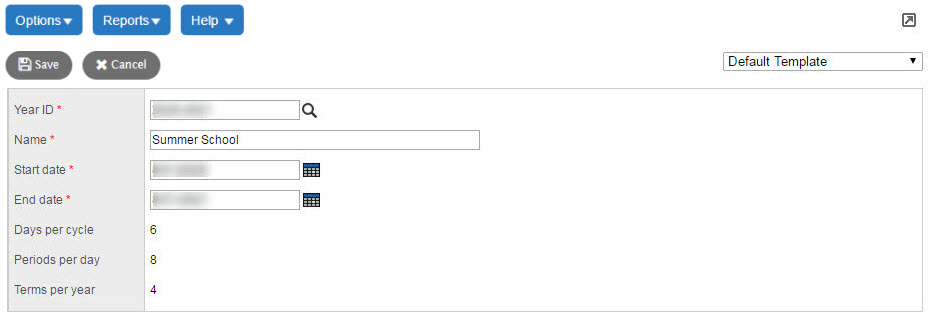
- At the Year ID field, select the current school year.
- Type a schedule name.
- Type
or click
 to
select the start and end dates for the summer school schedule.
to
select the start and end dates for the summer school schedule.
-
Note: These dates default to the start and end dates of the calendar you created and initialized.
- Click Save.
- On the Options menu, click Set Active Schedule. The system confirms that you want to set this schedule as the active schedule for the current year for this school.
- Click OK.
Add courses to summer school catalog
After you create summer school courses
in the
To add courses to the summer school catalog:
- Log on to the School view. Be sure to select the virtual summer school you created.
- Click the Schedule tab.
- Click the Courses side-tab.
- On the Options menu, click Add. The Course Pick List appears.
- From
the Course Catalog
drop-down, select the current school year:
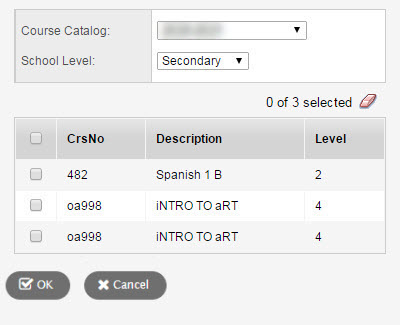
- Find
and select the summer school courses you added to the
- Click OK.
Now, create the summer school master schedule.
Create the structure of a summer school schedule
To create a summer school schedule, define its terms, days, and periods. Most summer schools have one term, one day, and one or two periods. Also, if you are going to track which rooms classes will be scheduled in, create rooms.
To create terms, days, and periods for summer school:
- Log on to the School view. Select the virtual school you created for summer school.
- Click the Schedule tab.
- Click the Structure tab and do the following:
- Click Terms to create a summer school, or several summer school terms. On the Options menu, click Add to create the term for summer school.
- Click Days to define the number of days in the summer school schedule. On the Options menu, click Add. The Add Day pop-up appears. At the Day Count field, type the number of days in your summer school schedule. Then, define their IDs and names.
- Click Periods to define the number of periods during a summer school day. On the Options menu, click Add. The Add Period pop-up appears. At the Period Count field, type the number of periods for each day of your summer school schedule. Then, define their IDs and names.
To create the rooms that will be used for summer school sections:
- Log on to the School view. Be sure to select the virtual summer school you created.
- On the Schedule tab, click the Rooms side-tab.
- On the Options menu, click New.
- Enter the information for each room you need to create, and click Save.
Create the master schedule for summer school
Now, create the master schedule for summer school by adding courses to the schedule.
To create the master schedule:
- Log on to the School view. Be sure to select the virtual summer school you created.
- On the Schedule tab, click the Sections side-tab.
- On the Options menu, click Add. The New Schedule Master page appears.
- Enter information in the fields you need for summer school.
Populate rosters for sections
Determine which students will take which classes.
|
Note: You can create snapshots of the students in each section. |
To populate the rosters of sections:
- Log on to the School view. Be sure to select the virtual summer school you created.
- On the Schedule tab, Master side-tab, click Sections.
- Select a section, and click Roster on the side-tab.
- On the Options menu, click Add. The Multi-Add pop-up appears.
- At the Schedule Mode field, select Pull to pull the students you select into the section.
- Click
one of the following to select the students to enro
grade input
Enter
Then,
staff members can enter
To
prepare
- Log on to the School view. Be sure to select the virtual summer school you created.
- On
the
- Select
the courses teachers will be entering
- On
the Options menu, click
Show Selected
to prepare
- On the Options menu, click Prepare Grade Input.
- Complete
the Prepare
-
Note: Be sure to select the term you created for summer school.