Create Advanced Mode queries
Advanced mode queries search
for records based on the system’s lists of tables, fields, and operators,
but have more functionality than Simple queries. When you use a saved
Advanced query![]() a request to find a group of records that match specific criteria at a particular time, you have the option of
changing the search criteria before it completes the search. And you can
save an Advanced query as a filter
a request to find a group of records that match specific criteria at a particular time, you have the option of
changing the search criteria before it completes the search. And you can
save an Advanced query as a filter![]() a set of criteria to selectively screen out incoming information, such as "all active students" or "former students" so
it appears on your Filter menu
a set of criteria to selectively screen out incoming information, such as "all active students" or "former students" so
it appears on your Filter menu
![]() . You then can easily run it from there,
and you'll be prompted to enter the values. This allows you to create
the query once, but use it for multiple purposes.
. You then can easily run it from there,
and you'll be prompted to enter the values. This allows you to create
the query once, but use it for multiple purposes.
For example, create an Advanced query to search for all students graduating in 2030 who are in homeroom 100. After you save this query and run it again, you can change some or all of the search criteria. You can search for students graduating in 2030 who are in homeroom 150. Saved Advanced queries can be changed to search for records based on different criteria than the criteria they were originally created for. See other examples.
| Note: The first item to choose is the Table. The table listed is the Root Table for the tab you are on. This is important because it will determine which other related tables can be chosen. You may need to go to the appropriate tab to be able to run the query you want. |
| Example: You want to create a query that prompts the user to find students in a particular grade. These values are stored on the Student table. However, you cannot select Student at the Tables field if you are on the Grades tab. Navigate to the Student tab, and perform the query there. |
| Note: Other queries include Simple mode and Direct SQL. |
To create an Advanced query:
- Go to a list page, such as the Student List.
- On the Options menu, click Query. The New Query pop-up appears.
- In the upper-right corner, select Advanced Mode from the drop-down:
-
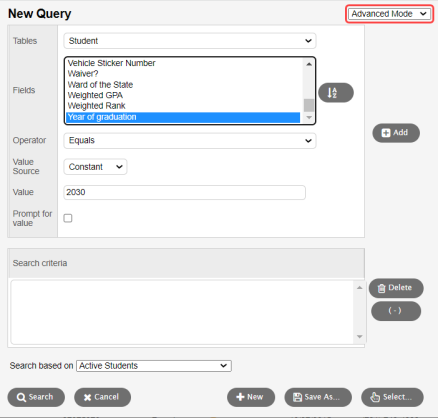
- At the Tables field, select the table you want to search information in. The table you select determines the available selections in the Fields box. For example, when you select the Student table, fields such as Year of graduation and Last name appear.
- At Fields, select a field you want to include in the search criteria.
|
Note: Fields
within each reference table are listed from most commonly used to least
commonly used. To change this order to alphabetical, click the Alpha
Sort button |
- At the Operator field, select an operator. For example, to search for students with a specific year of graduation, select the following:
- Fields: Year of graduation
- Operator: Equals
- The Value Source field tells the query to either compare your Fields selection to what you enter in the Value field, or to compare it to another value available in the system when the query is run. Select one of the Value Source selections listed in the following table. Your selection in the Value Source field determines the behavior of the Value field.
-
Note: For additional help using these selections, see your Aspen system administrator.
Value Source selection
Description/Function
Example
Value field Behavior
Constant
Compares your Fields selection to the Value you enter, compares two values in the same record.
Note: Simple Mode queries are always Constant.
The front office needs a list of students graduating in 2030 who are in homeroom 100.
Value: Enter the value the query is comparing to your Fields selection.
Prompt for value: Select if you want the option of changing the value when you run the query again.
Note: This prompt is enabled only for Constant and Default value sources.
Default
Compares your Fields selection to a date relative to the current date, such as the current week, the current year, the current school quarter, and the current school year.
On a daily basis, the front office staff needs to find all students absent on the current day.
Value: Enter the value the query is comparing to your Fields selection.
Prompt for value: Select to have the option of changing the value when the query is run again.
Note: This prompt is enabled only for Constant and Default value sources.
Preference
Compares your Fields selection to a system preference value.
Note: The system preferences are set up by your Aspen administrator.
A superintendent needs a list of all students with an ”active”
Value: Enter the value the query is comparing to your Fields selection.
Session
Compares your Fields selection to a value from the current system and user session. These values are variable, such as the time the user logged on, or the school being viewed.
Note: Using this value source is for advanced users, administrators, customizations, and support purposes.
Value: Enter the value the query is comparing to your Fields selection.
- If you select the Prompt for valuecheckbox, the following 'Search criteria' pop-up appears when the query is run. This gives the user the option of changing the value in the search criteria.
-
Note: If you provide a value in addition to selecting the Prompt for value checkbox, the value will be used as a default in the 'Search criteria' pop-up.
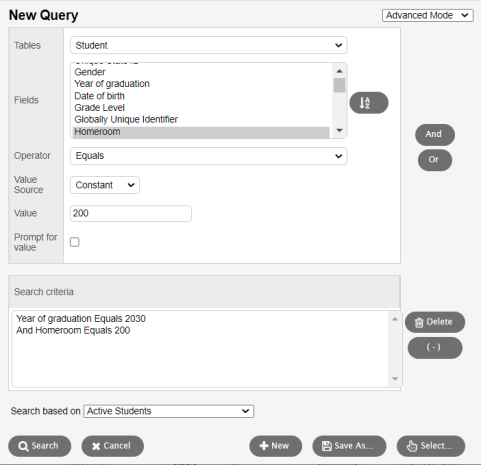
- Click Add to add the criteria to the Search criteria box.
- Click Delete if you want to delete the criteria from this search. Otherwise, you can either add other criteria, or click Search to search for students who match the one criterion you defined.
- To add other criteria, select the Table, Field, and Operator and enter the Value, if appropriate. Then, click And or Or to determine if the students should meet the first criteria, the second criteria, or both to be included in your search:
-
- At Search based on, select the records you want to search on to determine which records are included in this query.
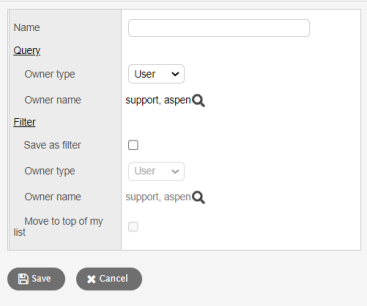
- Click Save As to save the query so you can use it again or to give other users access to it:
-
- Use the following table to fill in the fields:
-
Field
Description
Name
Type a name for the query.
Query Owner type
Click this drop-down to select one of the following:
- User: to give a user or yourself access to the query
- School: to give users at a school access to the query
-
-
Query Owner name
Click
 to change the owner of the query. The owner can edit a saved query.
Save as filter
Select this checkbox to have this query automatically appear on the Filter menu
 on
this page for all users who are given access to it. If this is
selected, the next three fields are accessible.
on
this page for all users who are given access to it. If this is
selected, the next three fields are accessible.Filter Owner type
Click this drop-down to select one of the following:
- User: to give a user or yourself access to the filter
- School: to give users at a school access to the filter
- Intermediate Organization: to give all users in
-
Filter Owner name
Click
to change the owner of the filter. The owner can edit a saved
filter.Move to top of my list
Select this checkbox to have this filter appear first on your Filter menu
.Notes:
- Including queries on your Filter menu allows you to quickly select a group of records when you access a list page.
- If a query is first on your Filter menu, it becomes your default filter.
- Click Save.
- Click Search. The list page displays the records that meet your search criteria.