District (Root Organization), Intermediate Organization and School calendars
Before you can enter attendance in any of the schools in your
| Note: Intermediate organizations can initialize and modify calendars for themselves and their schools if allowed by their root organization’s preferences. The root organization must first initialize a calendar specifying its start and end dates and in-session dates. Then, the intermediate organizations can initialize their own calendar(s) using those dates as a framework. |
When you initialize a calendar, you determine the session dates and the dates that school is not in session.
| Note: When you
initialize a |
To initialize
- Do one of the following:
- To initialize
- To initialize intermediate organization calendars, log onto the Intermediate Organization view, and the associated tab.
- Click the School Years
side-tab. Select the school year you want to initialize a calendar
for.
Note: See "Define and Set the
- On the School
Years side-tab, click Dates.
The Calendar page appears.
Note: If the
- You can modify the
- To initialize the
calendar, on the Options menu,
click Initialize Calendar.
Step 1 of the Calendar Initialization wizard
 a sequence of dialog boxes which walk a user through a potentially complex task, such as the Build Study Locations wizard
appears.
a sequence of dialog boxes which walk a user through a potentially complex task, such as the Build Study Locations wizard
appears. -
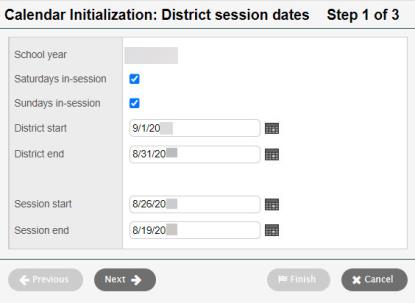
- Use the table to fill in the fields:
-
Field
Description
Saturdays in-session/
Sundays in-session
If schools in your
Note: The Define the start and end dates of the
Note: The Session start/Session end
Define the session start and end dates. This defines when school is actually in session during that
- Click Next. Step 2 of the Calendar Initialization wizard appears.
-
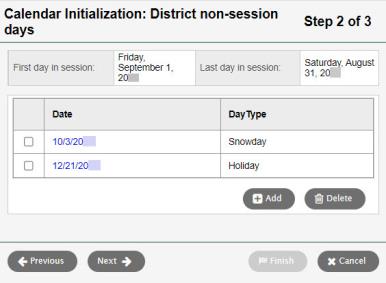
- The session dates you defined in Step 1 appear at the top. Define all the days that attendance will not be taken during that calendar year, such as in-service days, holidays, and vacations.
- To add a date that
is not in session in the
- Click
 to select the date, or type the date. Then, use the drop-down in the
DayType column to select the reason school
is not in session.
to select the date, or type the date. Then, use the drop-down in the
DayType column to select the reason school
is not in session.Note: We suggest defining all known not-in-session days before you complete initializing. Re-initializing an existing calendar to include new not-in-session dates deletes the existing calendar and replaces it with the new calendar you initialize. After you initialize the calendar, you can use the Modify Calendar option to add or remove not-in-session days, particularly if you do not want to change the day number assignments for given dates.
- Click Next. Step 3 of the Calendar Initialization wizard appears.
-
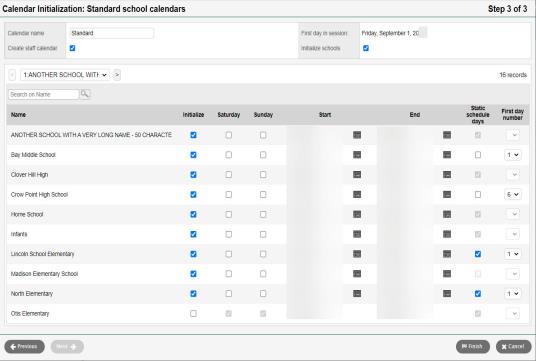
- Type the Calendar name. This is the name that will be used for the calendar at each school you select to include in the initialization.
- Select the Create staff calendar checkbox to
create a staff calendar for the
Note: Creating a staff calendar ensures the system deducts leave time for only days that school is in session. To access the staff calendar, in the
- When selected, the Initialize schools checkbox places a check in the Initialize column next to every school listed in the Name column, so you can initialize calendars for all of the schools at the same time. If only some of the schools listed will use this calendar, deselect this checkbox, and check the Initialize box next to the names of those schools.
- Use the table to select or enter information in each column for each school:
-
Field Description Initialize
Select this checkbox for each school you want to initialize this calendar for.
Saturday, Sunday
A checkbox appears in the Saturday and Sunday columns if you determined they are in session in your
Start, End
The session dates you defined in Step 1 appear in the Start and End columns. You can edit these for a specific school.
Example: If the high school begins a day later than the elementary schools, change the date in the Start column. Static schedule days
Select this checkbox if calendars at these schools do not adjust schedule days for not-in-session dates. For example, if the schedule operates with Days 1-7, and the day before a holiday is Day 4, the schedule day when school resumes is Day 6.
Note: If you use the Modify Calendar option to mark a day not-in-session, the ability to reassign day numbers is disabled. Once the system assigns numbers to days during this initialization, they cannot be changed. First day number
Select the schedule day number to use for the first in-session date in the school calendar. This option is disabled for schools that do not use scheduled day numbers.
- Click Finish. Now, for any schools you initialized this calendar for, the calendar appears in the School view.